This Chart Will Make Mixing Songs 10 Times Easier
A simple frequency chart that shows you exactly where every instrument sits in a mix. Stop guessing and start placing sounds with confidence.

Key Takeaways
- Use panning, frequencies, and distance together instead of adjusting one dimension at a time.
- Place your most important elements (lead vocal, snare, kick) dead center for maximum attention.
- High-pass almost everything except kick and bass to clean up unnecessary low-end buildup.
- Control distance with reverb amount and volume - more reverb and quieter means farther away.
- Test your mix at barely audible levels to check if vocal, kick, and snare still cut through.
Ever wondered where the hell your hi-hats should sit in the mix? Or how loud your snare should be compared to everything else?
I used to stress about this stuff constantly — until I created this simple visualization that changed everything. It’s a 3D chart that breaks down mixing into three core pillars, and it’s made my mixing decisions 10 times easier.
This isn’t just another boring frequency chart you’ll forget about. This is a complete way to think about mixing that covers panning, frequencies, AND the secret sauce that most producers ignore — distance and volume relationships.
I also made a full video on this…
All the ideas in this article come from the video below. If you don't feel like reading, well, I gotchu.
Part of the Vocal Mixing series — For the full picture, read my complete vocal mixing guide.
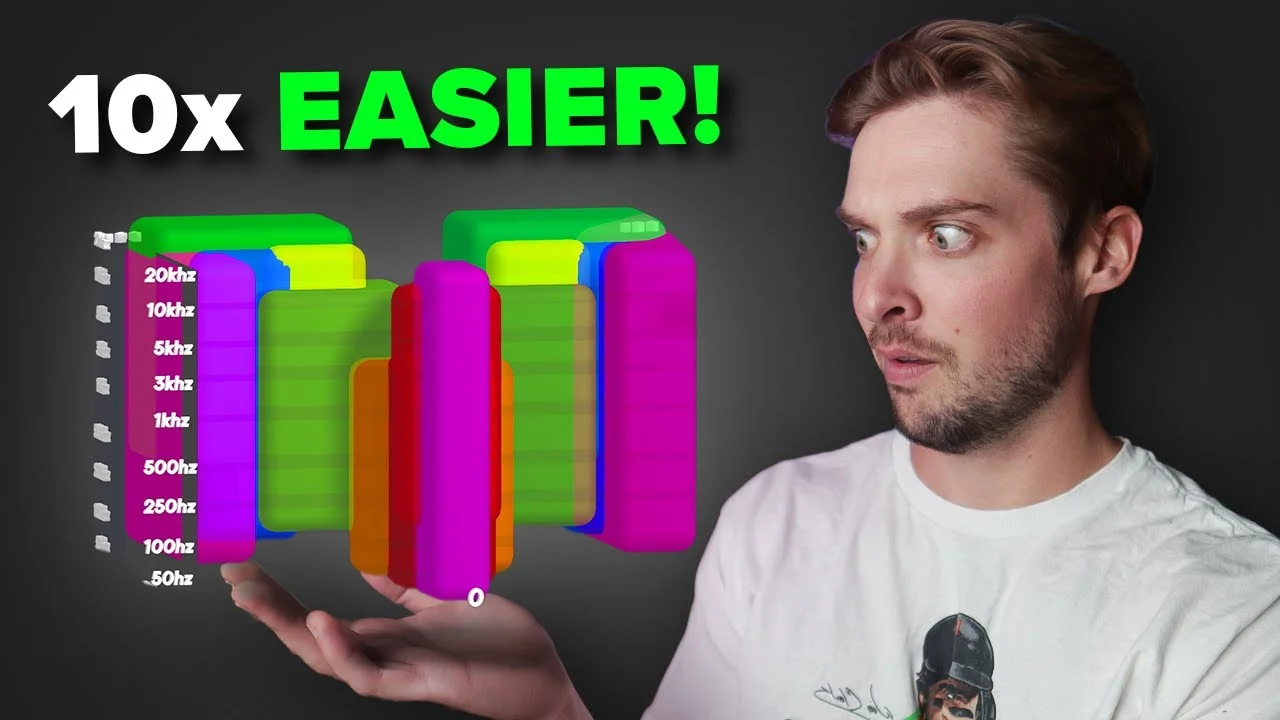
The 3D Mixing Chart Explained
Here’s what this chart looks like — and yeah, my 3D skills are pretty terrible, but bear with me.
The chart has three axes, each representing a crucial part of mixing:
- X-axis: Stereo panning (left to right placement)
- Y-axis: Frequency spectrum (bass to treble)
- Z-axis: Distance and volume (close to far)
Each instrument gets its own colored box showing where it should live in this 3D space. Your lead vocal sits front and center. Your bass hangs out in the low frequencies. Your background vocals spread wide and sit back in the mix.
The beauty of this approach? You’re not just thinking about one dimension at a time. You’re seeing the complete picture of where every element belongs.
I’m going to break down each pillar one by one, then show you exactly how I use this chart to mix a real song.
Pillar 1: The Stereo Spectrum and Panning
Panning is when you move an instrument away from the center and place it louder on either the left or right side. Simple concept, but it creates the illusion of width and puts sounds in a more realistic space.
Some instruments should stay locked in the center. Others need to spread out wide to give your song depth and dimension.
Reading the Panning Values
On my chart, the bottom numbers represent panning from -64 (hard left) to +64 (hard right). Some DAWs use -100 to +100, but I use Logic which works on a MIDI system of 128 values.
Here’s how I typically place instruments:
Dead Center (0):
- Lead vocals
- Snare drum
- Kick drum
Slightly Off-Center:
- Hi-hats (usually panned 10-20% left or right)
- Lead synths or piano
Wide Placement:
- Background vocals (often hard-panned left and right)
- Double-tracked guitars
- Stereo synth pads
The Doubling Concept
Notice how some elements in the chart have doubles on each side? That’s because I’m double-tracking them — recording the same part twice and panning one take hard left, one hard right.
This creates massive stereo width. Your brain hears two slightly different performances of the same part, which sounds way more natural and expansive than just using a stereo widener plugin.
Center vs. Wide — What Gets Attention
Here’s the key principle: anything panned down the middle will be more noticeable than things panned left or right.
Think about real life — are you going to focus on the person directly in front of you speaking to both ears, or the person 10 feet away talking in your left ear? Exactly.
That’s why your most important elements (lead vocal, snare, kick) live in the center. Everything else supports from the sides.
Mixing with Panning — Real Example
Let me show you how this works on an actual song. Opening up my mixer, everything starts panned dead center — which sounds flat and boring.
Step 1: Move the Hi-Hats
Looking at my chart, the hi-hats aren’t exactly center. I’m taking them and moving them slightly to the left — not hard-panned, just enough to get them out of the way of the lead vocal.
Step 2: Spread the Background Vocals
These background vocals are fighting with my lead when they’re center-panned. Following the chart, I’m panning them hard left and hard right. One vocal hard left, another hard right, and keeping one quieter in the middle for fullness.
Step 3: Widen the Guitars
I’ve got two MIDI tracks playing the same guitar part (this is supposed to replicate double-tracked guitars). I’m panning one hard left, one hard right. This creates that wide, professional guitar sound you hear on records.
Step 4: Piano Placement
The piano needs to get out of the vocal’s way. Instead of just using the pan knob, I’m adding a subtle chorus effect that naturally spreads it away from center. Sometimes effects work better than hard panning.
After these panning moves, the mix already sounds way more three-dimensional. Each element has its own space, and nothing is fighting for the same spot.
Pillar 2: Frequencies — Finding Each Instrument’s Pocket
Frequencies are probably what most producers think about first when mixing. It’s important, but honestly? It’s not as crucial as the distance/volume relationship I’ll cover later.
Still, getting your frequencies right is vital. Every instrument needs its own pocket of space in the frequency spectrum to be heard clearly.
Understanding the Frequency Map
Looking at the left side of my chart, you’ll see frequencies from 20Hz up to 20kHz. In reality, this should be on a logarithmic scale, but my 3D skills aren’t that good.
Here’s how instruments typically sit:
Sub-Bass (20-60Hz):
- Kick drum fundamental
- Bass guitar low end
- Almost nothing else should live here
Bass (60-250Hz):
- Kick drum body
- Bass guitar main energy
- Some vocal warmth (but you can cut most of it)
Low-Mid (250Hz-1kHz):
- Snare drum body
- Guitar/piano fundamentals
- Vocal power (400-800Hz is crucial)
Mid (1-4kHz):
- Vocal presence and clarity
- Snare crack
- Guitar/piano articulation
High-Mid (4-8kHz):
- Vocal air and brightness
- Hi-hat presence
- Cymbal shimmer
Treble (8-20kHz):
- Air and sparkle on everything
- Cymbal sizzle
- Vocal breathiness
Key Frequency Insights from the Chart
Kick Drum: Should be the lowest element, focused around 60Hz with some punch around 2-5kHz.
Bass: Starts around 50Hz but focused more in the 100-300Hz range. Should end around 3kHz.
Snare: Doesn’t need anything below 150Hz, but can go all the way up to 10kHz for that crack and sizzle.
Vocals: Take up the entire frequency spectrum. We’ve evolved to hear human voices across all frequencies, which is why vocals are so prominent in mixes.
Overlapping is OK
Here’s something crucial — overlapping frequencies are totally fine. Just because your vocal covers the entire spectrum doesn’t mean you cut everything else out of those ranges.
Instruments share frequency space all the time. It’s about balancing the energy in each frequency band, not creating isolated pockets.
Mixing Frequencies — Cleaning Up the Low End
The most important frequency move I make on every mix? High-passing almost everything except kick and bass.
Let me show you on this track:
Hi-Hats: Absolutely don’t need any information below 200Hz. I’m cutting it all out.
Claps: Same deal — high-passing to remove unnecessary low-end buildup.
Snare: I’ll high-pass this too, but more carefully since it needs some body.
Guitar/Synth Elements: These have way too much low-end for no reason. I’m busing them together and high-passing the whole group to make room for the bass and kick.
This isn’t just about cleaning up mud — it’s about making your important low-end elements shine. When you remove unnecessary bass from everything else, your kick and bass suddenly have room to breathe.
Working in the Sweet Spot
Most of your mixing work happens in the mid-range between 100Hz and 1kHz. This is where the fundamental frequencies of most instruments live.
Above 1kHz, you’re dealing with harmonics — the overtones that give instruments their character. These are actually easier to mix because the waveforms are smaller and faster.
Below 100Hz, you need to be surgical. Those big, slow waveforms can’t coexist without turning into mud.
Remember: great sounds and good recordings are 80% of the battle. EQ is just the final polish, not a magic fix for bad source material.
Pillar 3: Distance and Volume — The Secret Sauce
Here’s the concept I never hear anyone talk about, but it’s absolutely crucial: distance in your mix.
When I say distance, I’m talking about how close or far each track feels from the listener. You control this with two main variables:
- Reverb amount
- Volume level
How Distance Works in Real Life
Think about someone speaking in a room. If they’re far away, you hear their voice plus all the echoes and reflections of that room. If they’re speaking right in your face, you hear almost no room sound at all.
Same principle applies to mixing:
- More reverb = farther away
- Less reverb (dryer) = closer
- Louder = closer
- Quieter = farther away
This creates a 3D depth in your mix that most producers completely ignore.
The Distance Hierarchy
Looking at my chart, here’s how I typically arrange distance:
Up Front (Dry + Loud):
- Lead vocals
- Snare drum
- Kick drum
Mid-Distance:
- Bass guitar
- Lead instruments
- Main piano/guitar parts
Far Back (Wet + Quiet):
- Background vocals with heavy reverb
- Pad synths
- Atmospheric elements
- Doubled guitars (sometimes)
Volume — The Foundation of Everything
Volume mixing is the most important part of mixing itself. Get your volume relationships right, and everything else becomes way easier.
Here’s my typical volume hierarchy:
- Lead vocal — loudest and most prominent
- Snare drum — second most important rhythm element
- Kick drum — foundation of the rhythm
- Bass — supports the low-end
- Everything else — fills in the gaps
The key is relative relationships. Your snare should always punch through, but it doesn’t need to be louder than your vocal.
Mixing Distance and Volume — The Final Touch
Let me show you how I use distance and volume to finish this mix:
Background Vocals: These need to sit way back. I’m adding them to my reverb bus with a heavy send, plus turning them down significantly. They should support the lead without competing.
Lead Vocal: This is already pretty dry and prominent — perfect. It should be the closest thing to the listener.
Synth Pad: This is too upfront for what it is. Adding reverb to push it back in the mix, plus turning it down. It should create atmosphere, not grab attention.
Acoustic Guitar Parts: These are too dry. Adding some reverb to give them space and dimension while keeping them supporting the lead.
The Quiet Mix Test
Here’s a crucial mixing tip: turn your entire mix down to barely audible levels. At low volumes, you should still clearly hear:
- Kick drum
- Snare drum
- Lead vocal
If other elements are louder than these three at low volumes, your balance is off.
Three-Dimensional Thinking
This chart works because it makes you think in three dimensions simultaneously:
- Left-Right (panning)
- Low-High (frequencies)
- Close-Far (volume and reverb)
Most producers work on one dimension at a time, which creates flat, boring mixes. When you consider all three together, you create actual space for every element.
Elements that are panned hard left with lots of reverb will feel much farther away than dry, center-panned elements. Use this to create depth and interest.
Before and After — Hearing the Difference
After applying this 3D mixing approach to my track, the difference is night and day.
Before: Everything fighting for the same space, flat stereo image, no sense of depth.
After: Clear separation between elements, wide stereo field, obvious front-to-back depth that pulls you into the mix.
The vocal sits perfectly upfront. The drums punch through with authority. The supporting elements create a rich, dimensional backdrop without getting in the way.
Making This Chart Work for You
This visualization has completely changed how I approach mixing. Instead of randomly adjusting EQ and wondering where things should go, I have a clear roadmap for every decision.
Download the full chart from my website and keep it handy while you mix. Use it as a starting point, not a rigid rulebook. Every song is different, but these principles will get you 90% of the way there.
The goal isn’t perfection — it’s clarity and dimension. When every element has its own pocket in 3D space, your mixes will sound professional and polished.
Remember: great mixing starts with great sounds and good recordings. This chart helps you arrange those elements effectively, but it can’t fix fundamental problems with your source material.
Start thinking in three dimensions. Your mixes will thank you.
Want the full walkthrough? My course Pro Vocals in 60 Minutes takes you from raw recording to polished vocal, step by step.
About Mattie
Mattie is a music producer, songwriter, and educator specializing in Logic Pro and vocal production. With over 10 years of experience in the music industry, he's helped thousands of artists transform their home studio recordings into professional-quality tracks.
As the founder of Music By Mattie, he creates tutorials, presets, and courses that simplify complex production techniques. His mission is to make professional music production accessible to everyone, regardless of budget or experience level.