1000 Hours of Vocal Mixing Tutorials in 30 Minutes
Everything I learned about mixing vocals after 12 years and 1000+ hours of tutorials — EQ, compression, reverb, delay, and the one thing that matters most.

Key Takeaways
- Pitch correction is essential for modern pop and hip-hop but genre dependent.
- Use subtractive EQ first, then add analog emulation for pleasant coloration and warmth.
- Chain multiple compressors in series for more natural results than one heavy compressor.
- More compression makes vocals upfront but reduces energy - balance through proper gain staging.
- Place delay before reverb and use delays instead of reverb in busy mixes.
I’ve spent 12 years obsessing over vocal production — recording, mixing, and processing literally thousands of hours of vocals. Every late night, every failed mix, every “why doesn’t this sound like the radio” moment has led to this.
What I’m about to share took me over a decade to figure out. By the end of this post, you’ll know more about vocal production than 95% of artists out there — without the years of frustration I went through.
Let’s dive into the 1000+ hours of vocal mixing knowledge condensed into the most essential techniques that actually matter.
I also made a full video on this…
All the ideas in this article come from the video below. If you don't feel like reading, well, I gotchu.
The Reality Check About Vocal Mixing
Here’s something most producers won’t tell you: the plugins and processing I’m about to show you aren’t the most important part of getting professional vocals.
I know that’s probably frustrating to hear when you clicked here for mixing tips. But stick with me — I’ll cover every plugin and technique you need, then blow your mind with what actually matters most at the end.
The vocals we’re working with today are from a custom track I made specifically to demonstrate these concepts. Let’s start with the plugin chain I use 90% of the time.
Pitch Correction: The Foundation of Modern Vocals
For modern production, pitch correction is make or break. But it’s also completely genre and singer dependent.
If your singer is naturally on pitch or you’re working with folk/acoustic genres, you might skip this entirely. For pop, hip-hop, and most contemporary styles? It’s essential.
Manual vs. Automatic Pitch Correction
There are two approaches, and each has its place:
Manual pitch correction involves individually moving each note. I use Melodyne for this. It gives the best results but takes significantly more time. You’re literally painting each note where it needs to be.
Automatic pitch correction does the work for you. It’s way faster but doesn’t sound quite as natural in my opinion. My go-to for automatic tuning is Autotune Pro.
For this track, the vocal was already mostly on pitch, so I’m using automatic to save time. But here’s the thing — the best vocals in the world use manual correction. Just like everything else I’ll teach you today, manual gives better results.
The choice comes down to time vs. quality. Know which battles to fight.
EQ: The Most Important Plugin You’ll Use
EQ is hands down the most important plugin in your vocal chain. It’s also the hardest to get right because every vocal, every microphone, every recording needs slightly different treatment.
Most people have absolutely no idea what they’re doing with EQ. They’re boosting random frequencies hoping something magical happens.
The Universal EQ Moves
Even though every vocal is different, I find myself doing these moves on almost every vocal:
- High-pass filter below 100Hz — removes unnecessary low end that muddles the mix
- High shelf around 8kHz — adds shine and presence
- Dip the mud between 250-750Hz — clears up the muddiness
These three moves alone will transform 80% of vocals. You can do this with any EQ — I love the FabFilter Pro-Q4 or even Logic’s stock EQ.
Notice that most of these are subtractive EQ — taking away sound rather than adding. Subtractive EQ tends to sound more natural, while additive EQ adds color (which can be great when used intentionally).
Adding Color with Analog EQs
When I want to add pleasant coloration, I turn to analog emulations:
Pultec-style EQ: Perfect for boosting highs above 8-10kHz. I’ll widen the bandwidth and boost for more overall presence. Same technique works beautifully for low-end warmth.
SSL-style EQ: I stole these exact settings from mixer Leslie Braithwaite about 8 years ago and used them on literally hundreds of vocals:
- High-pass filter to remove body
- Dip around 500Hz in the mids
- Another dip at 4kHz
- High shelf boost around 9kHz
The Mid-Range Rubber Band Concept
Here’s a concept that completely changed how I approach EQ:
Think of 1kHz as a rubber band. The more mid-range a vocal has, the more it snaps toward you and feels close. The less mid-range, the more it sits back and blends with the track.
You’d be shocked how much actual mid-range is on the vocals of your favorite songs. They’re not sitting back — they’re punching you in the face with presence.
Use this concept to bring vocals forward in busy mixes.
Compression: Glue or Destruction
Compression can either perfectly glue your vocal or completely destroy it. The difference is understanding these critical points.
Compressor Types Matter
Different compressor types color sound differently. My favorite for vocals is the FET-style compressor — most famously the 1176.
My typical 1176 settings:
- Fastest release possible
- Pretty fast attack
- 4:1 ratio
This adds a distinct flavor I’ve come to love and expect on my vocals.
Chain Multiple Compressors
I almost always use multiple compressors in series. This reduces the workload on any single compressor and leads to more natural-sounding results.
After adding compression, you might notice more low and low-mid buildup. Don’t be afraid to go back to your EQ and adjust accordingly.
The Energy vs. Compression Trade-off

Here’s something most tutorials don’t explain:
More compression = more upfront, less energy
Less compression = more energy, sits back further
For most modern mixes, you want to lean toward more compression. But there’s a way to have both energy AND compression through proper gain staging.
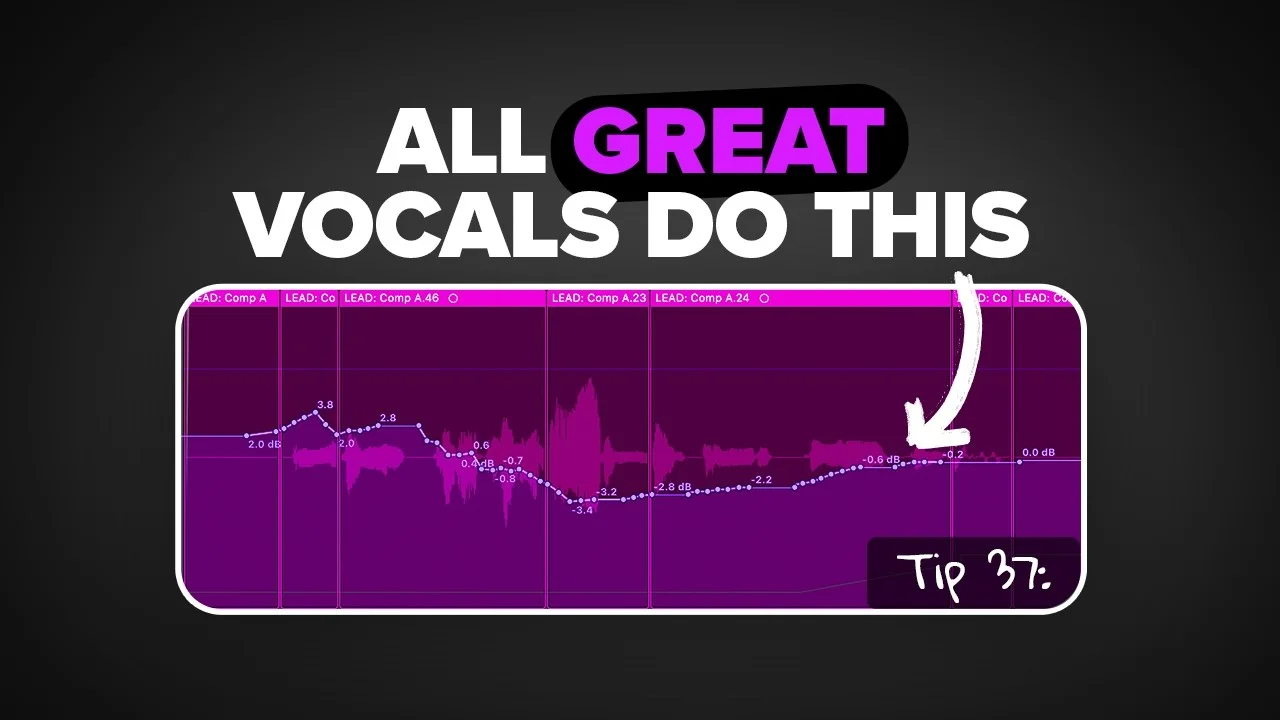
Gain Staging: The Secret Weapon
Notice those peaks in your vocal waveform? Those parts get compressed way more than the quieter sections, which destroys the natural dynamics.
Fix this by:
- Highlighting the loud sections
- Reducing their gain before they hit the compressor
- Creating separate regions so you can visually see the levels
You can do this in your DAW’s region editor or through gain automation. I prefer the region method because I can see exactly what’s happening.
De-Essing: Taming the Harsh Frequencies
A de-esser is basically a compressor that only targets a narrow range of high frequencies — specifically where S sounds and sibilance live.
Mics tend to exaggerate these harsh sounds, especially when you boost the top end like I recommended. De-essing is super easy to set up and you can immediately hear the difference.
Advanced De-Essing Techniques
Just like regular compressors, you can chain de-essers for more natural results. You can also place them at different points in your chain:
My favorite approach for really sibilant vocals:
- De-esser before EQ — controls harshness before boosting anything
- De-esser after compression — catches anything the compressor emphasized
This sandwich method gives you maximum control without over-processing.
Reverb: Creating Expensive-Sounding Space
Most people use reverb to “add space,” but if you want expensive-sounding vocals, you need to understand its nuances.
Insert vs. Bus Reverb
There are two main approaches:
Direct on track: Uses more CPU but faster to dial in and automate
Bus track: Less CPU, more control, takes longer to set up
I use both depending on the situation. For lead vocals where I’m working fast and creatively, I’ll throw reverb directly on the track. For background vocals or large track counts, I absolutely use bus reverb to save processing power.
The Distance Relationship
Here’s the key concept: More reverb = farther back in the mix
Think about it — if someone whispers in your ear, you hear no reverb. If someone yells from across a large room, you hear tons of reflections and reverb.
This relationship is how you place vocals in the perceived depth of your mix.
Bus Reverb with Creative Processing
What’s cool about bus reverb is you can add effects after the reverb to change the character:
- EQ to shape which frequencies get reverb
- Distortion for grit
- Guitar amps for character
- Chorus or flanger for movement
Automation: Manual vs. Automatic
The best vocals in the world manually automate reverb to fill empty spaces between phrases. This gives you that polished, professional sound.
You can automate either:
- The send amount to the reverb bus
- The reverb plugin itself (my preference)
If you’re feeling lazy, add a sidechain compressor to your reverb bus. Set the lead vocal as the sidechain source. When the vocal plays, it ducks the reverb. When it stops, reverb comes up automatically.
Manual sounds better, but automatic can save serious time.
Delay: The Underrated Space Creator
Delay and reverb are cousins — you can use all the same techniques. But delay has some unique advantages most people don’t know about.
Delay Before Reverb
I almost always put delay before reverb in the chain so the delay isn’t dry. On bus tracks, this means creating a delay bus that feeds into its own reverb.
My go-to delay is H-Delay. I’ll band-pass the output signal by pulling up the high-pass and pulling down the low-pass. This gets the delay out of the way of the lead vocal so both can coexist.
Delay vs. Reverb in Busy Mixes
Here’s one of my favorite tips: Delays are fantastic replacements for reverbs in busy mixes.
If your mids and low-mids are already muddy and convoluted, delay will still push the vocal back like you want without muddying up the mix nearly as much.
Set up H-Delay in milliseconds (not synced to BPM), drop it down a little, turn up feedback, and use the dry/wet knob to taste. You get that sense of space with zero reverb muddying up your mix.
Sync vs. Unsynced Delays
Want to hear your delay clearly? Take it off BPM sync and use milliseconds.
Want delay to blend with the track? Sync it to your BPM.
90% of the time I’m syncing to BPM, but this distinction is crucial when you need the delay to be heard as an effect rather than just space.
Manual Delay Placement
Sometimes what you hear as “delay” is actually multiple vocal tracks placed exactly where I want them. This gives me ultimate control over timing and processing of each repeat.
I might take the last word of a phrase, copy it to a new track, and place it exactly where it sounds best. Sometimes I’ll even record completely different background vocal parts over these “delays.”
Other Creative Effects: The Spice Rack
Here are some rapid-fire effects that can add serious character to your vocals:
Flanger
Great for adding width. Also works as a replacement if you didn’t record actual doubles or triples.
Formant Shifters
Always put these before any other plugins. They change the character of a voice without changing pitch — think gender-bending effects or robotic sounds.
Sampled Vocals
Take a portion of your lead vocal, drag it to Quick Sampler, turn on slice, and lower the transient sensitivity. Now you can play vocal chops on your keyboard — super creative for finding new ideas.
LFOs
Perfect for emulating sidechain pumping or rhythmic stutter effects. Modulate volume, filters, or any other parameter rhythmically.
Creative Bus Processing
Just like reverb buses, you can get wild with delay buses. Chain multiple effects: Delay → Sidechain Compressor → Distortion → Guitar Amp
This lets any delay going through the bus get processed by all these effects.
Reverse Vocal Swells
Take your lead vocal, add tons of reverb, bounce it with the reverb tail, then reverse the audio. Place this right before drops for that classic swoosh effect.
Frequency-Specific Distortion
Instead of distorting the entire vocal, try distorting only the high frequencies. Use a multiband tool like Saturn 2:
- Leave low and mids untouched
- Heavily distort everything above 3-5kHz
This adds presence and aggression without destroying the fundamental character.
Doubles and Triples: Width and Energy
Doubles and triples are when you record the same part multiple times. Pan one hard left, one hard right, and you create width that makes vocals sound huge.
Processing Doubles
I usually copy the exact settings from my lead vocal, then make two key adjustments:
- Tune doubles more heavily than the lead — they should be tighter
- Remove high-end with a shelf — lets the lead vocal shine through
Fake Doubles (When You Didn’t Record Them)
If you didn’t record actual doubles, you can fake them:
- Duplicate the lead vocal twice
- Use fine-tune: +15 cents on one, -15 cents on the other
- Pan one left, one right
This simulates the effect, but real recorded doubles always sound better. No question.
Octave Vocals for Extra Energy
For even more energy, record the same part an octave up or down. Layer these with your main vocal for thickness.
Whisper Vocals for Detail
Record the same part while whispering. This adds detailed high-end presence without being overbearing. Works especially well in pop production.
Timing: Tight vs. Loose
Want tighter, more polished sound? Sync all your doubles to the lead vocal timing. This is time-intensive — you’ll move every transient to match — but the result is incredibly tight.
Want more natural energy? Leave small timing differences.
I almost never time-correct my lead vocal to the grid — it can sound robotic. I look for a solid performance first, then work with what I have.
Background Vocals: The Unnoticed Game-Changer
Background vocals often go completely unnoticed, but without them, mixes feel empty.
Different Mic for Background Vocals
I recommend using a different microphone entirely for backgrounds. While lead vocals usually get a large diaphragm condenser (for that modern sparkle), backgrounds benefit from something warmer like a Shure SM7B dynamic mic.
This helps backgrounds stay in the background where they belong.
Easy Harmony Creation
When in doubt about what to sing for harmonies, find the chords in your instrumental and sing each note of the triad. That’s what I did for the harmonies in this example.
More Takes = More Options
The more background vocal takes you record, the more options you have for panning and the beefier your overall sound becomes.
Group Processing
When dealing with lots of background vocals, group them and process together. Often I’ll just add OTT (Over The Top compressor) — a fantastic free multiband compressor — and maybe some EQ. Keep it simple.
Backgrounds as Instruments
Don’t limit backgrounds to just supporting the lead. Use them to:
- Double synth lines for extra texture
- Replace synths entirely — your voice becomes the instrument
- Add movement and rhythm to static parts
I use my voice as an instrument way more than you might think.
Mixing Vocals: Volume and Balance
I used to think vocals should just sit “on top” of the mix. Then I learned these techniques.
Mix Into a Limiter
Always mix with a limiter on your master bus. The limiter affects the volume relationship between vocals and instruments. If it’s going to be there in the final mix, you need to hear it while mixing.
Mix in Mono
This helps you understand how everything sits together. If you’re on headphones, add a gain plugin to your stereo output and flip it to mono.
The Low Volume Test
Turn your monitors down until you can barely hear anything. The only things poking through should be:
- Snare drum
- Vocals and words
- Maybe kick drum
If that’s what you hear, you’re on the right track. This works with reference tracks too — test how they sound at whisper volumes.
Stop Soloing Vocals
Nobody listens to vocals by themselves. Stop mixing them in solo. They need to work with the full instrumental, not sound perfect in isolation.
Sidechain Everything to Vocals
Create a submix of all your instruments (everything except vocals). Add a sidechain compressor to this submix with the lead vocal as the trigger.
Set it to duck the mid-range slightly when the vocal sings. This helps vocals sit in the mix rather than just on top of it.
Editing: The Least Sexy (But Critical) Part
A good vocal take still needs editing to sound professional. Otherwise it just sounds like a demo.
Basic Cleanup
Vocal editing means:
- Removing extra noises, pops, clicks
- Taming plosives (those harsh P and B sounds)
- Adding fades to eliminate mouth noises
I heard a plosive in my example — a quick fade fixes it instantly. These small changes add up to huge improvements.
Gain Staging (Again)
I mentioned this before, but gain staging before compression is massive. If parts of your vocal are getting over-compressed while others barely hit the threshold, manually adjust the gain of those sections.
Noise Gates vs. Manual Cleanup
Noise gates can remove noise between vocal takes automatically. But just like everything else — manual cleanup gives better results.
Go through and actually remove problematic sections rather than relying on automation.
Comping: Building the Perfect Take
Comping (compiling) means taking your best recorded takes and stitching them together into one perfect mega-take.
You can get really detailed with this, but I recommend keeping it simple. Comping 6 takes is manageable. Comping 60 takes is a nightmare.
Critical point: When choosing takes, energy and emotion matter more than pitch. Pitch is easily fixable. Energy is not — there’s no plugin for that.
The Most Important Thing: The Recording
Here’s what most of you don’t want to hear: if you don’t get the recording right, nothing else matters.
I started this post with mixing because that’s what everyone expects. But honestly, all those plugins and techniques are worthless if your source recording sucks.
Microphone Distance
Closer to mic = boomier sound
Farther from mic = thinner sound
I stick to 4-6 inches from the mic. This distance prevents artists from “eating” the microphone while maintaining good proximity effect.
Pop Filter Placement
Set your pop filter at that 4-6 inch distance. It becomes both a distance guide and protection against plosives and sibilance.
Large Diaphragm Condensers
My favorite vocal mic type is large diaphragm condensers. They have the most modern high-end sparkle, which is crucial for contemporary vocal production.

Buy the best one you can comfortably afford. This isn’t the place to cut corners.
Desk Arm: The Game-Changer
This might sound weird, but get a desk-mounted boom arm. When I’m not recording, the mic swings away. When I need it, it’s plugged in and ready at mouth level.
More importantly, this setup lets me capture ideas instantly. If I don’t record vocal ideas the moment I have them, they disappear forever into the ether.
Standing vs. Sitting
Always record standing when possible. Standing opens up your lungs and diaphragm, giving you more supported, powerful sound.
I use a sit/stand desk so I can adjust height perfectly for recording.
The Performance Trumps Everything
All the plugins, techniques, and gear in the world can’t fix a bad performance. Focus on:
- Getting the emotion right
- Capturing energy and intention
- Multiple takes for comping options
- Proper microphone technique
What You Should Actually Focus On
After 12 years and thousands of hours of vocal production, here’s what actually moves the needle:
1. The recording itself — 70% of your sound comes from this
2. The performance — emotion and energy can’t be faked
3. Basic processing — EQ, compression, and timing
4. Creative decisions — doubles, harmonies, effects that serve the song
Everything else is polish.
Stop obsessing over which compressor plugin to use and start obsessing over capturing better performances. The best mixers in the world can’t save a lifeless, poorly recorded vocal.
Your Next Steps
If all these plugins and techniques still seem overwhelming, I’ve created free vocal presets that automatically apply these concepts using only stock plugins. Download them and start experimenting.
But remember — presets are training wheels. Your goal should be understanding why these settings work so you can make intentional decisions for every unique vocal.
The path to professional vocals isn’t about collecting more plugins or learning more techniques. It’s about mastering the fundamentals: great recordings, intentional processing, and serving the song above all else.
Now stop reading tutorials and go make something. The best way to learn vocal production is by producing vocals.
📚 More in the Vocal Mixing Series
Want a professional starting point? My Vocal Magic presets give you ready-made vocal chains for any genre — EQ, compression, reverb, and more, all dialed in and ready to go.
Or grab my free vocal presets to try before you buy.
About Mattie
Mattie is a music producer, songwriter, and educator specializing in Logic Pro and vocal production. With over 10 years of experience in the music industry, he's helped thousands of artists transform their home studio recordings into professional-quality tracks.
As the founder of Music By Mattie, he creates tutorials, presets, and courses that simplify complex production techniques. His mission is to make professional music production accessible to everyone, regardless of budget or experience level.