How I Gain Stage My Tracks for Maximum Clarity!
You ever notice how some of your songs sound more like a dysfunctional roller-coaster ride than a chart-topping hit? 🎢🤔 Well, today, we're diving deep into th

Key Takeaways
- Proper gain staging prevents clipping and noise while giving your plugins optimal input levels.
- Keep your stereo output bus around -12 dBFS to maintain proper headroom for mastering.
- Use VU meters for sustained sounds like vocals, but stick with dBFS for transient drums.
- Adjust clip gain or use gain plugins before processing, not your channel faders.
- Automate gain on dynamic vocals word-by-word for maximum clarity and natural energy.
Ever been baffled about why your mixes sound flat — lacking that oomph that professional tracks possess?
Today we’re diving deep into the unsung hero of punchy mixes: gain staging. Before you click away thinking this is another boring technical topic, I promise this has got some serious nuggets that’ll change your sound game for the better.
There are a lot of moving parts to gain staging that we need to dissect. And trust me — once you nail this foundation, so many other parts of your track will fall into place.
I also made a full video on this…
All the ideas in this article come from the video below. If you don't feel like reading, well, I gotchu.
Part of the Vocal Mixing series — For the full picture, read my complete vocal mixing guide.
What Exactly Is Gain?
Think of gain as your sound’s first impression. It’s the initial volume control for any sound source, determining just how strong a signal enters your mix.
But here’s where it gets interesting — gain is different than volume.
Some might ask: “Isn’t gain just another word for volume?” Not quite. While both relate to the loudness of a sound (amplitude), they serve different purposes:
- Gain sets the initial level
- Volume adjusts that level within the mix
Gain is the amplitude of the waveform before it hits any plugins. We can visualize gain in most DAWs by how high our waveforms appear on screen.
Volume, on the other hand, is affected by the fader — this is the actual output after the plugins process your signal. Gain comes before, volume comes after.
Why Does Gain Matter So Much?
Proper gain staging is like having good posture for your mix. It:
- Shapes your mix foundation
- Minimizes pesky noise
- Reduces distortion
- Ensures ample headroom for mastering
When you get gain staging right, everything else becomes easier. Seriously.
Proper gain staging leads to minimal noise and distortion while maximizing your amplitude and output. Here’s why that matters:
Noise is naturally present when we record sounds. If our gain isn’t high enough, when we finally compress those sounds, you’ll hear that background noise come through loud and clear. Not good.
Alternatively, if we record our signals too hot, we start getting digital distortion and clipping. Done subtly, this can be a good effect — but most of the time it’s not what we’re after.
The Hidden Danger: Stereo Bus Clipping
Here’s something that catches a lot of producers off guard. Even if all your individual tracks look clean and green — none of them clipping — your stereo output bus can still be clipping.
This is crucial to watch. You might have perfect levels on every single track, but when they all combine at the master bus, you’re suddenly in the red.
I recommend shooting for around -12 dBFS on your stereo output bus to ensure you have enough headroom to work with. This gives you creative freedom for mastering without introducing unwanted distortion.
How We Measure Gain: dBFS vs VU Meters
In any digital audio workstation, they use something called dBFS — decibels full scale. This is our modern way of measuring loudness.
But loudness is complicated. We don’t have any loudness meters that perfectly replicate how we hear sounds. The way our brain interprets volume is different than how computers do.
Transients (sharp spikes in sound) often register as much louder to computers than they do to our ears. That initial burst of energy from a transient might clip your output bus, whereas with our ears we wouldn’t think of it as much louder than a sustained sound that measures significantly quieter on dBFS.
Enter VU Meters
Before digital, analog consoles used VU meters. VU meters measured loudness over a longer period of time, so they more closely reflected how our actual ears hear gain and volume.
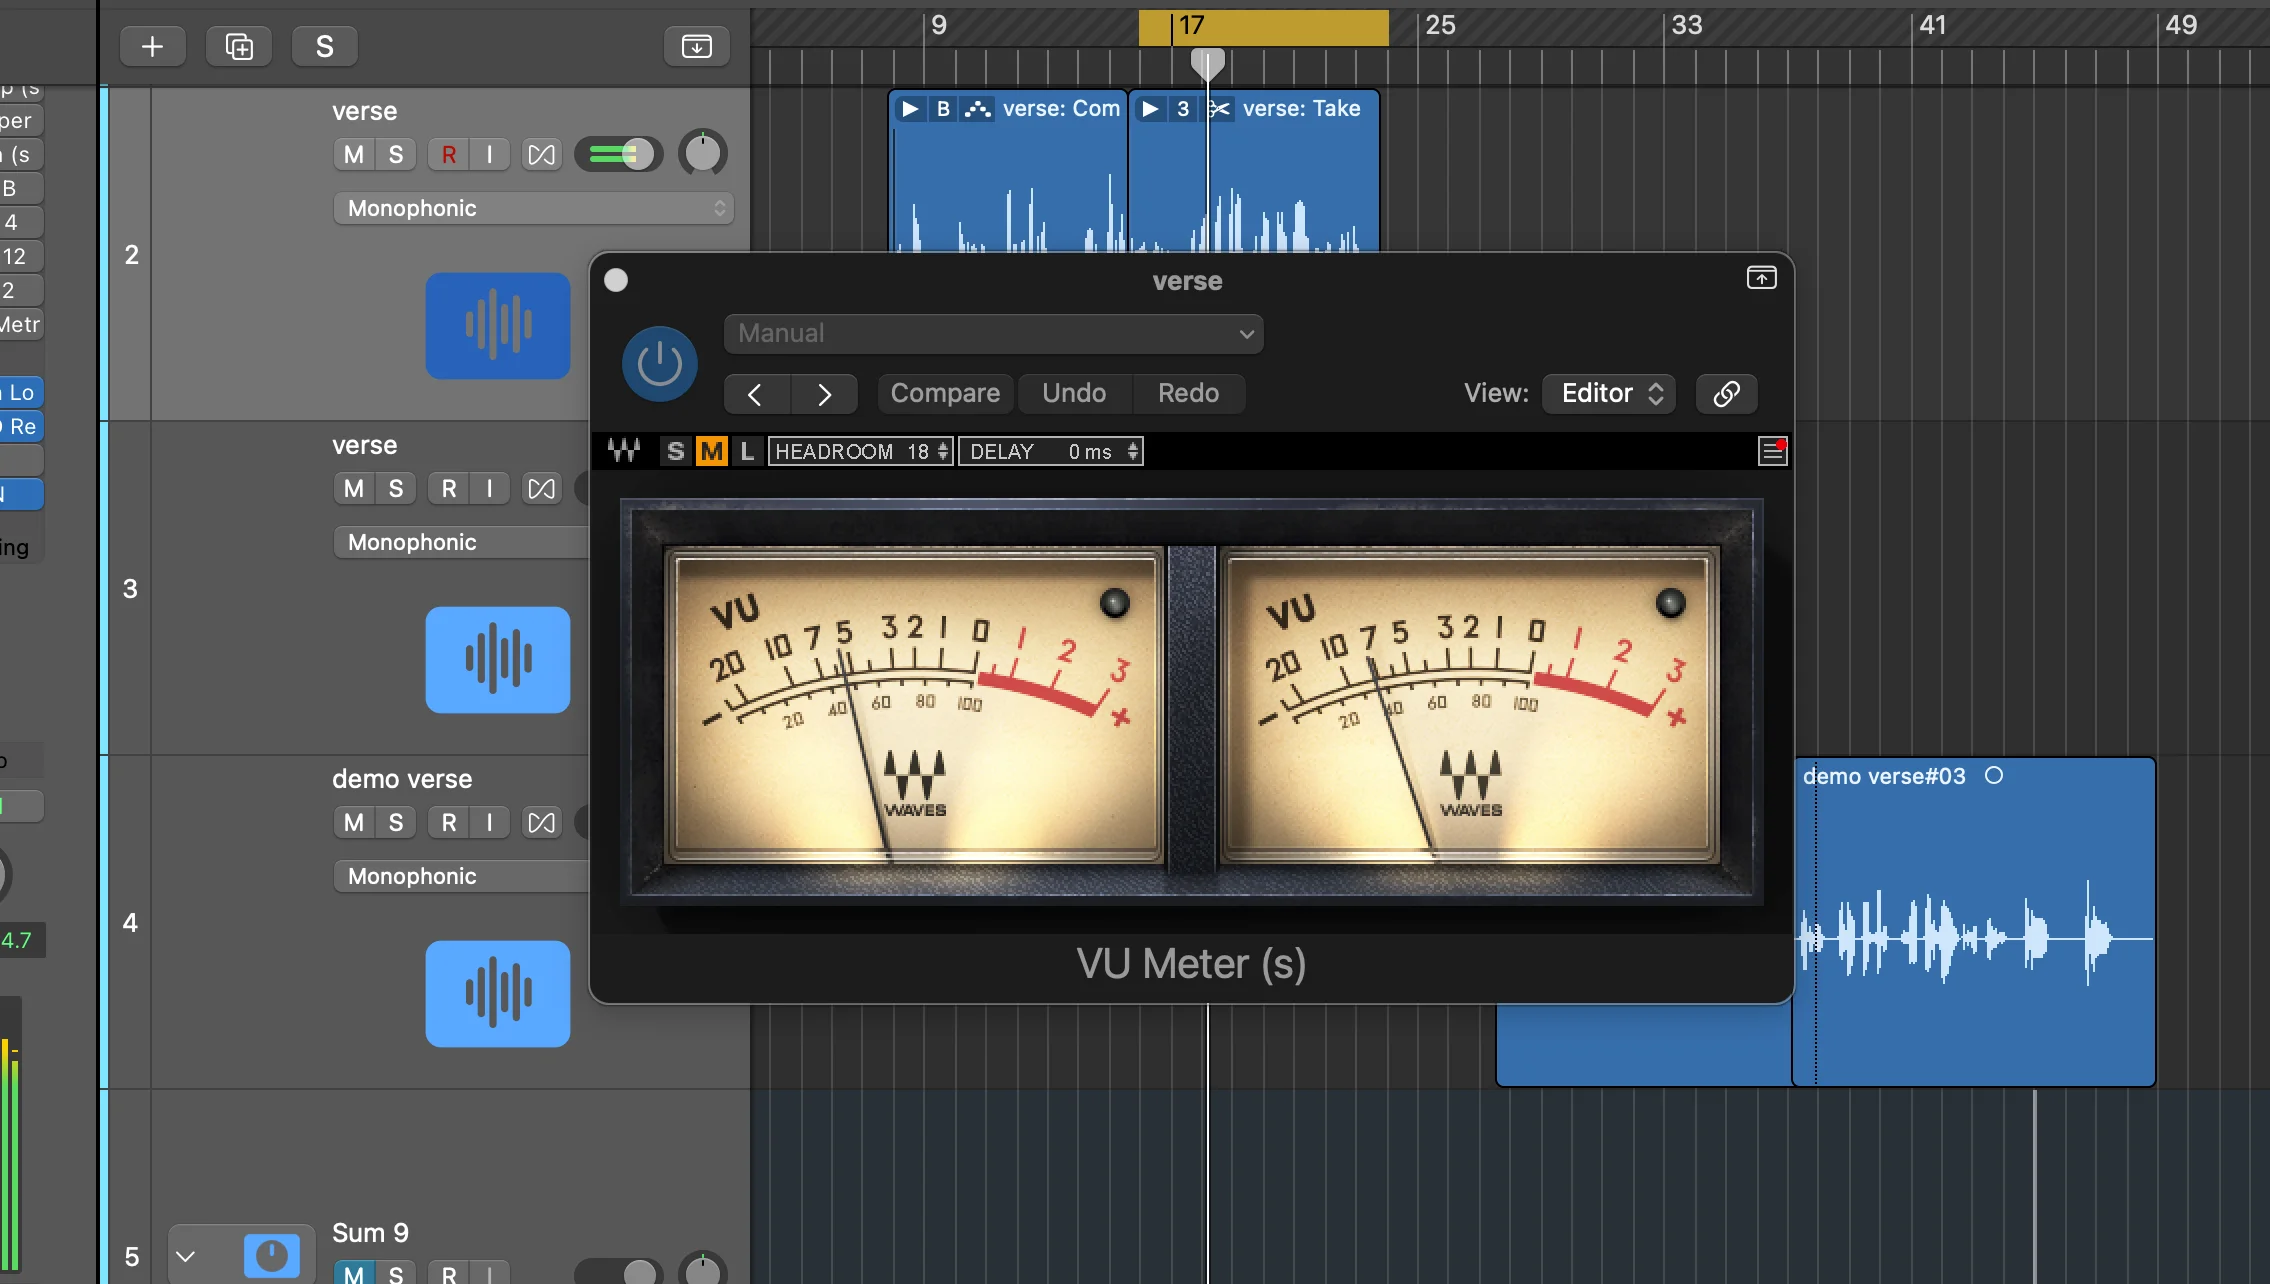
Here’s why this matters: A lot of digital plugins were based off their analog counterparts. They were optimized to perform their best with a distinct gain input signal. In this case, the VU meter becomes your best friend for finding that sweet spot.
I use a VU meter from Slate Audio, but there are free ones available everywhere. When using a VU meter, I’m looking for it to sit around zero — this is very different than dBFS.
Many producers say if a dBFS signal is around -18, it’ll be around zero on VU meter standards. But this doesn’t always equate exactly. You might be at zero on the VU meter while showing -12 dBFS, even peaking at -6.
For tracks you’re planning on processing heavily, shoot for around zero dB on a VU meter. This is how plugins were designed originally, and how digital reproductions work today. Better signal flow between plugins = better end results.
When to Use VU Meters (And When to Avoid Them)
Use VU meters on sustained, non-transient sounds that you’ll be processing heavily — especially vocals, bass, and sustained instruments.
Avoid VU meters on transient sounds like drums. Here’s why:
Since VU meters look at loudness over a longer period, transient sounds are harder for them to detect accurately. I tested this on a drum kit — the dBFS showed reasonable peaks around -11, but when I adjusted to hit zero on the VU meter, the dBFS shot up to clipping at +12.3 dB.
For super transient sounds, trust your ears and stick with dBFS.
How to Actually Change Gain
Remember: gain is not volume. We’re not adjusting the fader here — that’s for after the plugins. We want to adjust gain before it hits any plugins.
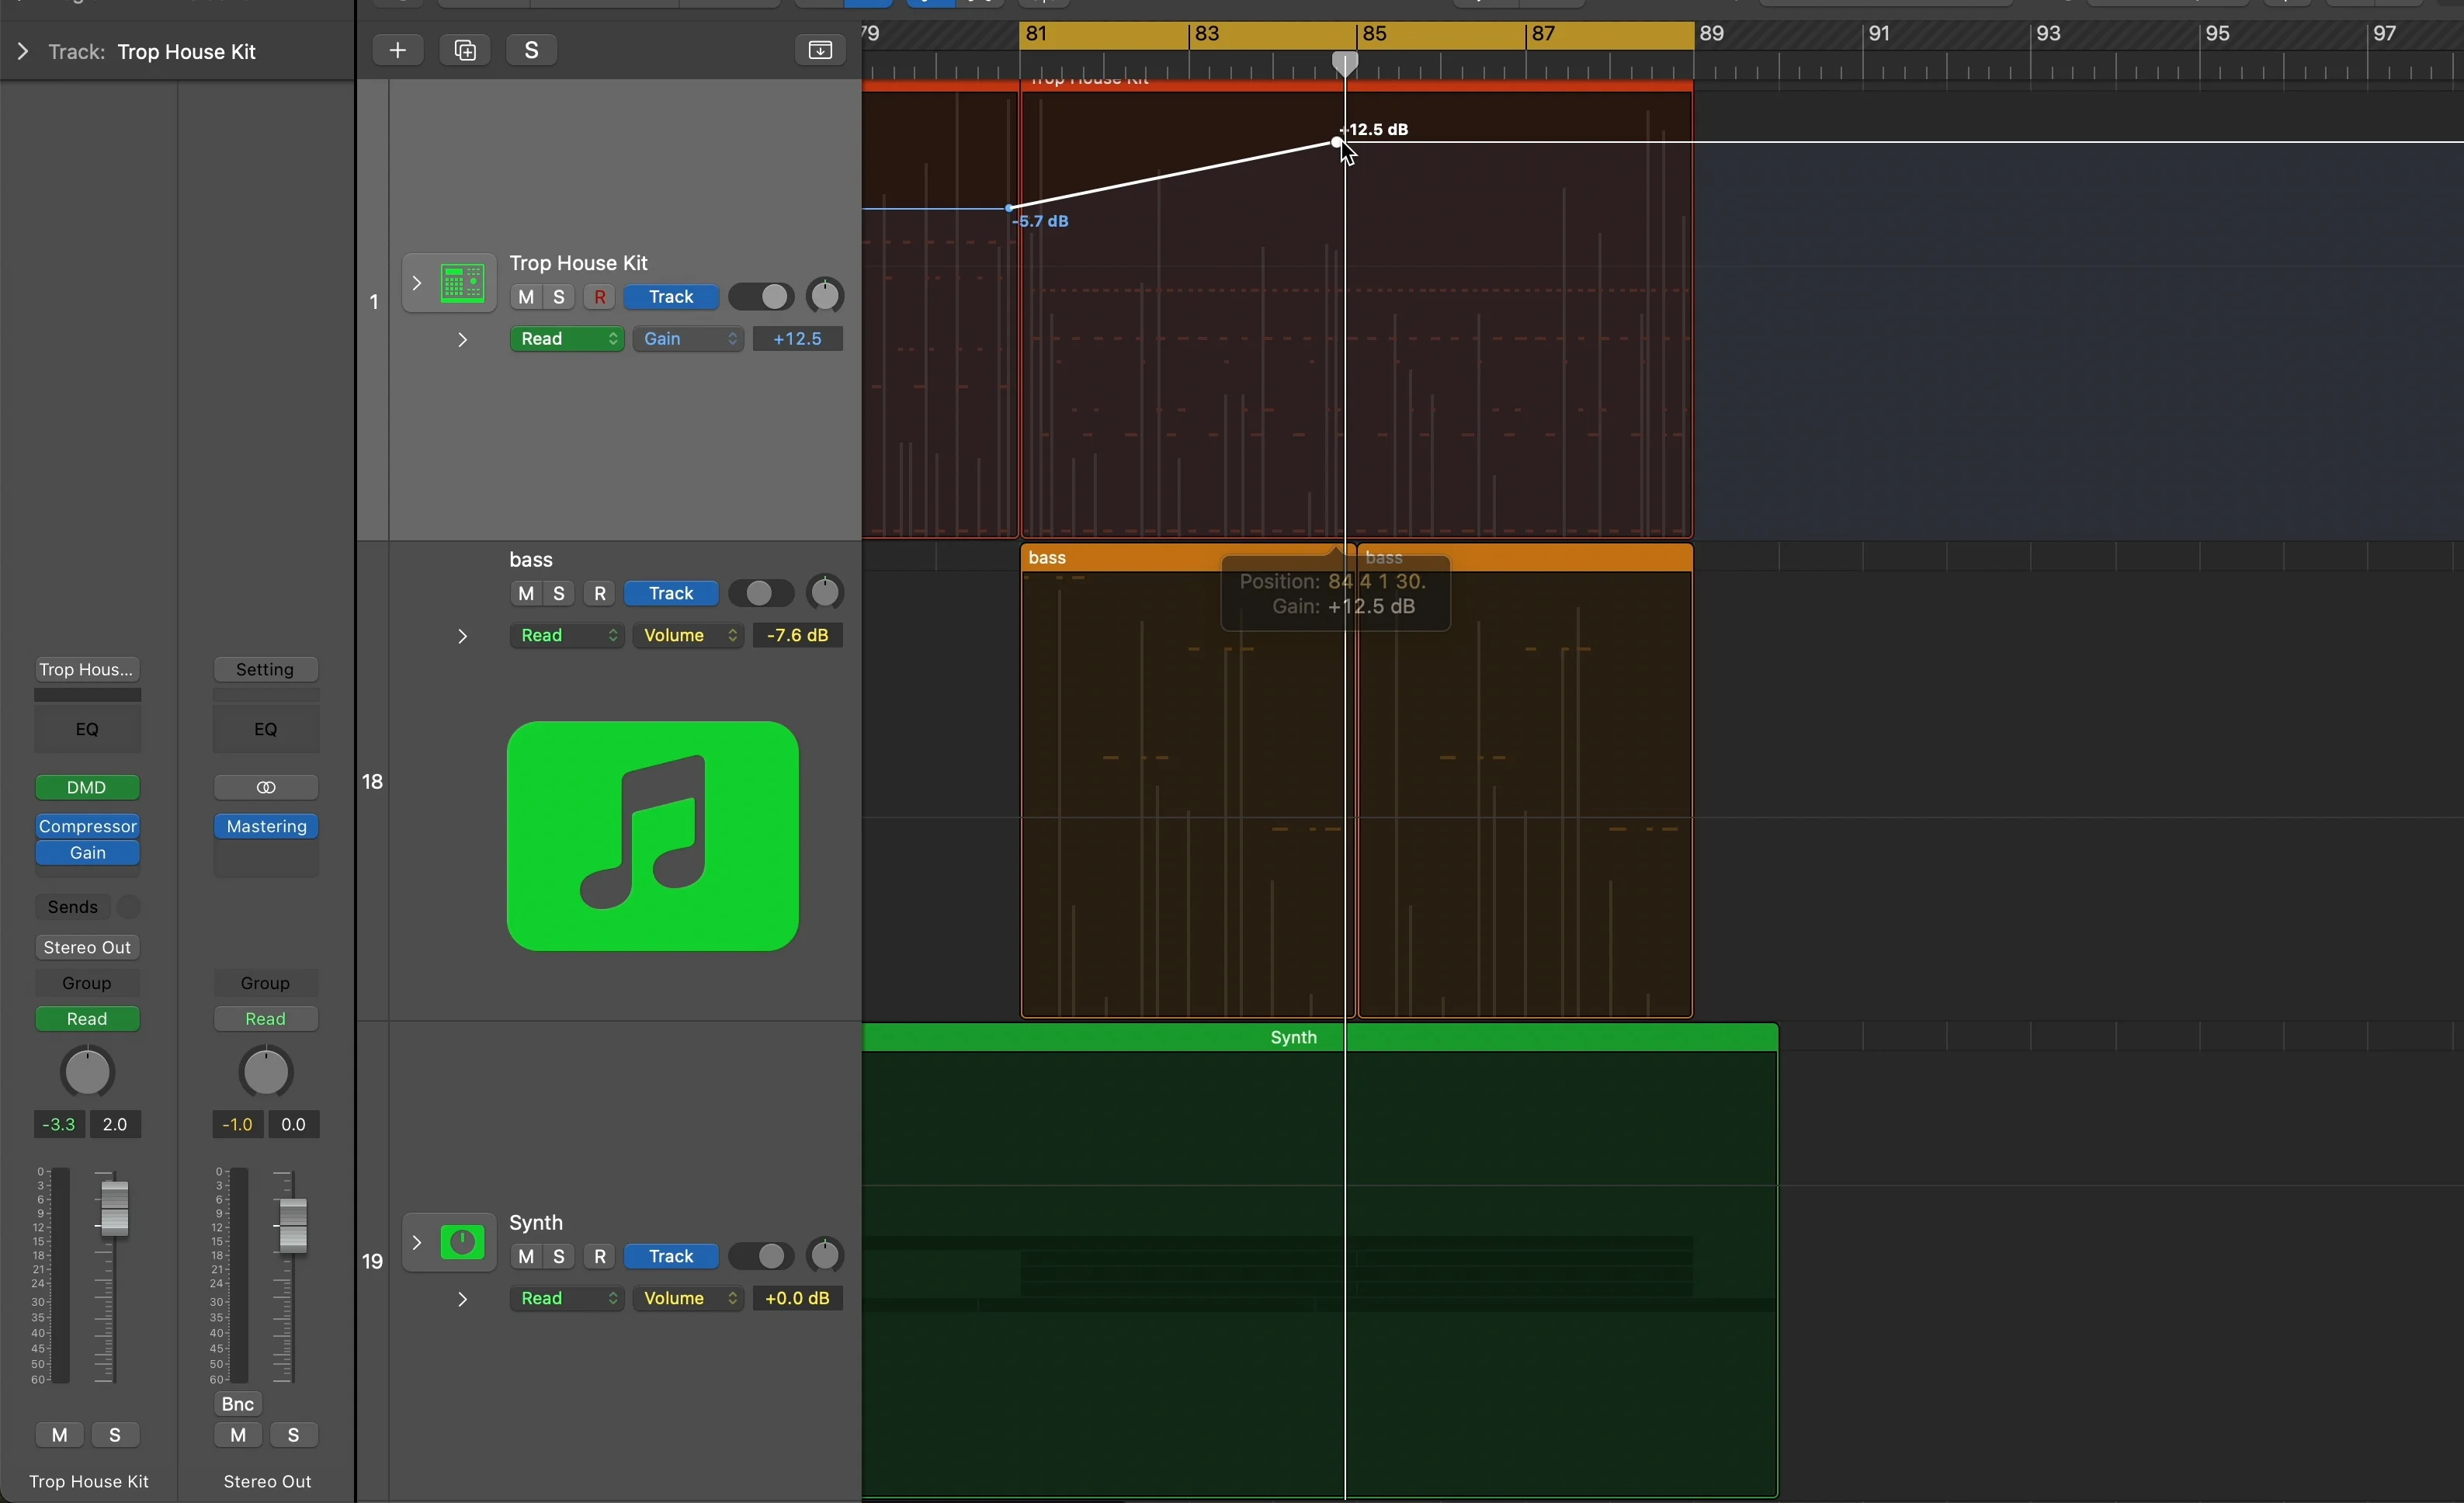
Method 1: Clip Gain (My Favorite)
Click on your track, go to the inspector window, and drag the gain up. This is called clip gain or region gain depending on your DAW.
The waveforms get visually bigger because the amplitude is actually increasing. This is exactly what we want — it’s visual feedback that you’re doing it right.
Method 2: Gain Plugin
Put a gain plugin as the very first plugin in your chain. I’ll use Logic’s stock Utility Gain plugin. Just adjust the gain up or down as needed.
Use a combination of clip gain and a gain plugin to hit those appropriate levels. Your mix will start popping in ways you didn’t expect.
The Pro Secret: Automating Gain
The best producers in the world do this on ultra-dynamic signals like vocals — they automate the gain so you can hear every single word clearly.
Here’s how I do it:
- Put a gain plugin on the vocals
- Check the dynamic range
- Press ‘A’ to open automation
- Choose gain automation, not volume (this way you can still adjust the fader later)
- Go through word by word, adjusting parts that are too quiet or too loud
This is tedious but gives the best results. If you tried to fix these problems with compression alone, you’d end up with lifeless, energyless recordings.
By automating gain first, you preserve the natural energy and quotient of the original performance.
Logic Pro’s Hidden Gem: Normalization
Logic has this incredible feature that I haven’t seen integrated as seamlessly in other DAWs — region gain normalization.
Select all your tracks, click Functions > Normalize Region Gain. You can set your parameters and choose the algorithm. I usually go with Peak rather than overall loudness (LUFS).
Since we’re targeting -12 dB dBFS on our stereo output, I set this to normalize each region so it peaks at -14 dB. This gives us headroom while saving massive amounts of time.
Logic automatically detects and adjusts each audio file so they peak at your target level. Way to go, Logic.
My Complete Gain Staging Workflow
Here’s exactly how I set up tracks for proper gain staging:
Step 1: Organization
- Go through every sound
- Group like sounds together
- Color-code tracks (makes mixing easier)
Step 2: Initial Normalization
- Select all tracks
- Functions > Normalize Region Gain
- Set to -18 dB (good starting point for VU meter compatibility)
Step 3: Check Stereo Output
Check your stereo bus — you should be sitting pretty close to that -12 dBFS target.
Step 4: Rough Mix with Gains Only
Here’s the crucial part: keep every fader at unity (0 dB).
Why? Control and precision. When faders are pulled down to -7 and you make a slight movement, you might jump a whole decibel. At unity, you get way more granular control — barely moving the fader gives you 0.1 dB adjustments.
It’s way more beneficial to use a gain plugin beforehand rather than pulling faders down.
Step 5: Visual Waveform Adjustment
Click on the waveform display and bring up the visual levels so you can see them better. This helps with visual mixing cues.
Step 6: VU Meter Check on Key Elements
Throw a VU meter on your lead vocals and other heavily processed elements. Make sure they’re sitting around zero on the VU meter for optimal plugin performance.
What Proper Gain Staging Does for Your Songs
When you nail gain staging, several things happen:
Your plugins work better because you’re using them at the input volume they were designed for. You probably never thought about this before, but it’s huge.
Mixing becomes easier because your faders are set to unity. No more fighting with pulled-down faders.
You get more creative freedom in mastering because you have proper headroom without digital distortion or clipping.
Your mixes will sound more professional — that “oomph” you’ve been missing starts appearing naturally.
The Time Investment That’s Worth It
Gain staging a song like this might take 10-20 minutes. But I promise the results you’ll get afterward are worth every second.
There’s no substitute for getting this foundation right. If you’ve never thought about input levels for your plugins before, it’s time to start.
Your mixes are going to turn out so much better. You’ll be able to do so many more things without introducing digital distortion or clipping — and that’s exactly what you want.
The foundation makes everything else possible. Get your gain staging locked in, and watch how much easier everything else becomes.
Now stop making excuses and go gain stage your current project. Your future self (and your listeners) will thank you.
Want a professional starting point? My Vocal Magic presets give you ready-made vocal chains for any genre — EQ, compression, reverb, and more, all dialed in and ready to go.
Or grab my free vocal presets to try before you buy.
About Mattie
Mattie is a music producer, songwriter, and educator specializing in Logic Pro and vocal production. With over 10 years of experience in the music industry, he's helped thousands of artists transform their home studio recordings into professional-quality tracks.
As the founder of Music By Mattie, he creates tutorials, presets, and courses that simplify complex production techniques. His mission is to make professional music production accessible to everyone, regardless of budget or experience level.