
Fix Your Pitchy Vocals with Flex Pitch in Logic Pro X
If your vocals are still sounding warped, weird, or downright bad after adding pitch correction, chances are you need to go back and do some more vocal editing.

Key Takeaways
- Flex Pitch can't save vocals that are too far off-pitch from the start.
- Set your song's key first, then apply 75% pitch correction to all notes globally.
- Use the six-dot system to control pitch drift, vibrato, and formants on individual notes.
- Re-record any vocal sections that are less than 80% there after initial corrections.
- Combine Flex Pitch editing with traditional pitch correction plugins for the smoothest results.
Even advanced pitch correction plugins can’t save vocals that were recorded too far off pitch.
You know what I’m talking about — you throw Antares Auto-Tune or Melodyne on a vocal that’s completely off-key, and instead of getting smooth, professional-sounding vocals, you end up with robotic, warped nonsense. Basically off-key T-Pain.
The problem isn’t your pitch correction plugin. The problem is that no amount of automated pitch correction can fix a recording that’s fundamentally too pitchy. But here’s the thing — Logic Pro’s Flex Pitch can.
I’m going to walk you through exactly how to transform those pitchy vocal performances into workable, studio-quality recordings using nothing but Logic Pro and some focused editing work.
I also made a full video on this…
All the ideas in this article come from the video below. If you don't feel like reading, well, I gotchu.
Part of the Vocal Mixing series — For the full picture, read my complete vocal mixing guide.
Setting Up Flex Pitch in Logic Pro
Before we dive into the editing magic, you need to get Flex Pitch running on your vocal track.
First things first — make sure you’re working with one single take of an audio track. Flex Pitch won’t work properly if you’re trying to analyze multiple takes or comped vocals.
Here’s how to enable it:
- Click the Flex Time button in Logic’s top toolbar
- Enable Flex Time for your specific audio track
- From the dropdown menu that appears, select Flex Pitch
Once you turn on Flex Pitch, Logic will analyze your vocal recording and break it down into individual notes. This processing can take a minute or two depending on the length of your vocal.
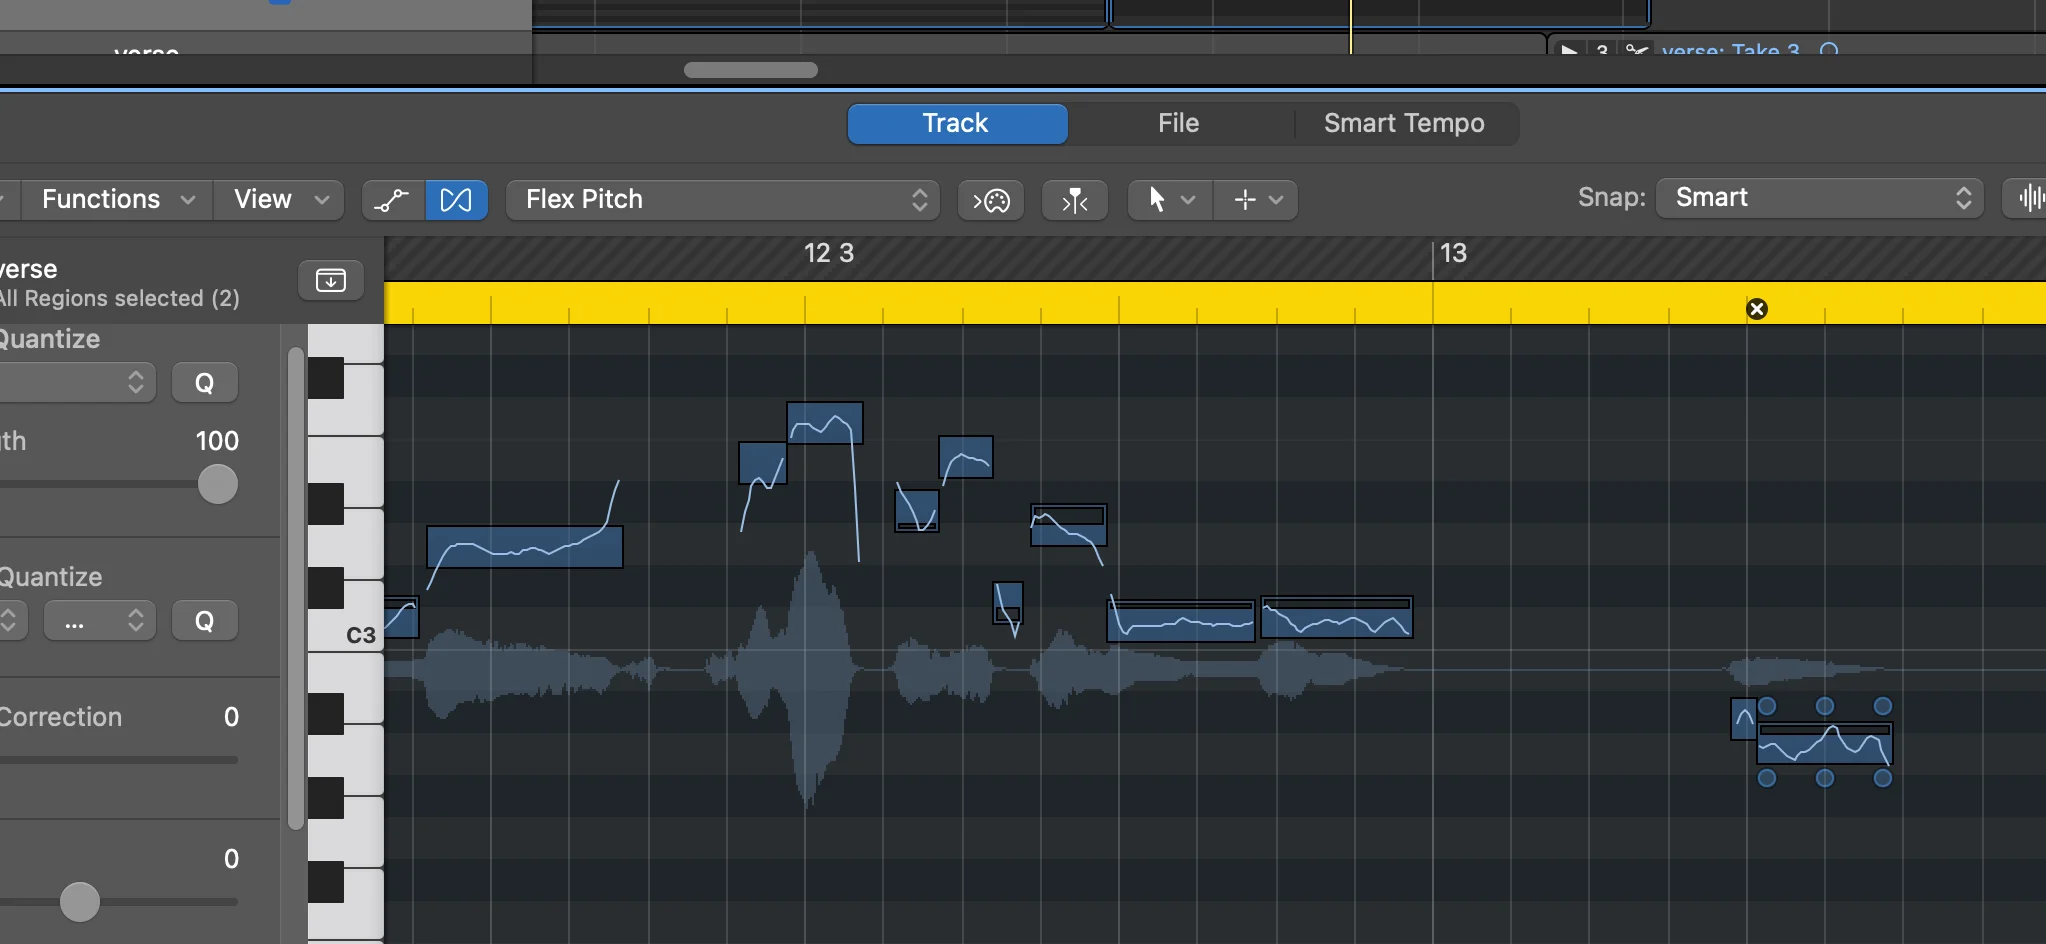
After the analysis is complete, your audio track will look completely different — you’ll see these note-like blocks that represent each detected pitch in your performance.
Viewing Your Vocal Analysis
To really see what Flex Pitch detected, you need to open the editor window.
Hit E on your keyboard or click the editor button to open the track editor. Make sure you’re in Track view so you can see all the analyzed notes.
What you’re looking at now are faux MIDI notes — Logic’s approximation of the pitches it detected from your singing. Each block represents a different note or pitch that Logic identified.

But here’s the key detail most people miss: that white squiggly line running through each note block? That’s the actual pitch contour of your voice throughout the recording. The blocks are just Logic’s best guess at organizing those pitches into discrete notes.
And Logic doesn’t always get this analysis right on the first try.
Quick Pitch Corrections in Arrangement View
If you just need some basic pitch adjustments, you can work directly in the main arrangement window.
Zoom out a bit and you’ll see horizontal lines above and below each note block:
- Lines above the middle = sharp notes
- Lines below the middle = flat notes
You can drag these lines toward the center to automatically snap the note to perfect pitch according to Logic’s detected scale. Or double-click any line to instantly move it to the closest “correct” note.
This method is fast, but there’s a major limitation: Logic will move notes to the closest detected pitch, not necessarily the note you actually want. If your original recording was way off from your intended melody, this auto-correction might make things worse.
That’s why I prefer diving deeper into the editor view for more precise control.
Fine-Tuning with Flex Pitch Editor
The real power of Flex Pitch comes from manual editing in the track editor.
Set Your Song’s Key First
Before you start editing individual notes, set your song’s key in Logic. This gives Flex Pitch the proper scale reference for its corrections.
If you don’t know your song’s key, you’ll need to figure that out first. Once you’ve set the correct key, you can apply scale-based pitch correction to your entire vocal.
Apply Global Pitch Correction
Select all your vocal notes (Command + A) and set the pitch correction amount to around 75%. This pushes your vocals toward perfect tuning while maintaining some natural inconsistencies and character.
You can adjust this percentage based on your taste and the style of music you’re making. Higher percentages give you more correction, lower percentages preserve more of the original performance’s character.
Listen and Assess Each Section
Now comes the critical part — listen to each vocal section individually and assess whether it’s working with the rest of your song.
Here’s my rule: if any vocal part is less than 80% of the way there after these initial corrections, stop what you’re doing and re-record that section.
Seriously.
It’ll save you hours of editing time, and you’ll get a much better end result. Flex Pitch is powerful, but it can’t completely transform a fundamentally bad recording.
Advanced Note Editing with the Six-Dot System
When you zoom into individual notes in Flex Pitch, you’ll see six dots surrounding each note block. Each dot controls a different aspect of that note’s sound:
Top Row Dots
- Top left dot: Controls pitch drift at note entry — how the singer entered the note
- Top middle dot: Fine pitch control for the entire note (measured in cents — 1/100th of a semitone)
- Top right dot: Controls pitch drift at note exit — how the singer left the note
Bottom Row Dots
- Bottom left dot: Gain control — adjust the volume of individual notes before they hit your compressor
- Bottom middle dot: Vibrato control — adjust the “waviness” of the note. Set to completely flat for an Auto-Tune effect
- Bottom right dot: Formant control — changes the weight and character of the voice
Understanding Formants
Formants deserve special attention because they’re incredibly powerful for vocal character changes.
Low formant = deeper, more monstrous voice character
High formant = thinner, brighter voice character
Think of formants as the “weight” your voice carries. If you’re shifting notes by more than a few semitones, you’ll want to adjust formants to maintain realistic vocal character.
Formants are honestly mind-blowing in what they can do to transform vocals, but they’re beyond the scope of this post. If you want a deep dive into formant techniques, let me know.
Fixing Incorrectly Placed Notes
Here’s where things get tricky — sometimes Flex Pitch gets the note analysis completely wrong.
You’ll see this when the white pitch line extends way outside the note block, or when you hear Logic trying to correct to a note that’s obviously not what was sung.
This happens for two main reasons:
- You sang a different note than what Logic identified
- You were really pitchy and Logic got confused about what note you intended
Creating New Notes with the Scissors Tool
For the first problem, you need to manually create separate notes using the scissors tool.
Set the scissors tool as your secondary tool, then hold Command and click where you want to divide the note. Look for where the pitch line seems to change direction or settle into a different pitch area.
After cutting the note, you can edit each section independently using the six-dot system I described earlier. This gives you way more accurate pitch correction because you’re working with the actual notes that were sung.
Cleaning Up Pitchy Sections
For sections that were just really pitchy, focus on the vibrato dot (bottom middle) and pitch drift dots (top left and right).
Reducing vibrato can help stabilize wobbly notes, while adjusting pitch drift can smooth out how notes start and end. Sometimes a combination of both techniques will get you where you need to be.
Joining Notes Back Together
If you cut a note and decide you don’t like the result, you can use the join tool to reconnect note sections.
Select the notes you want to rejoin, then Command + click with the join tool selected. Honestly, I rarely use this tool, but it’s there if you need it.
The scissors tool is my go-to for Flex Pitch editing.
Using Flex Pitch with Traditional Pitch Correction
Here’s where things get really interesting — you can use Flex Pitch before applying traditional pitch correction plugins.
When you’ve already cleaned up the major pitch issues with Flex Pitch, plugins like Auto-Tune or Melodyne flow like butter over your vocals. You get that modern tuned sound without the harsh artifacts and robotic warping.
This combination approach works incredibly well for genres that want that polished, radio-ready vocal sound. The Flex Pitch handles the heavy lifting of note accuracy, while the pitch correction plugin adds the final smoothness and character.
The Complete Flex Pitch Workflow
Here’s my complete process for fixing pitchy vocals:
- Enable Flex Pitch and let Logic analyze the recording
- Set the song key for proper scale reference
- Apply 75% pitch correction to all notes as a starting point
- Listen to each vocal section and assess the results
- Re-record any sections that are less than 80% there
- Fine-tune individual notes using the six-dot editing system
- Cut and edit incorrectly placed notes with the scissors tool
- Apply traditional pitch correction if desired for additional smoothness
When Flex Pitch Isn’t the Answer
Flex Pitch is incredibly powerful, but it’s not magic. There are some situations where it won’t save your vocal:
Rhythmic issues — While you can adjust timing in Flex Pitch, I strongly recommend getting rhythm right during recording. Flex Pitch timing corrections often sound unnatural.
Fundamentally bad performances — If the singer was way off pitch throughout the entire take, or if the recording quality is poor, you’re better off re-recording.
Extreme pitch corrections — If you’re trying to change notes by more than a few semitones, the vocal will start sounding artificial even with formant adjustments.
The Bottom Line
Flex Pitch is one of the most underrated tools in Logic Pro for vocal production.
When you combine careful Flex Pitch editing with traditional pitch correction plugins, you can transform mediocre vocal performances into professional-sounding recordings. The key is understanding that Flex Pitch handles the foundation of pitch accuracy, while other tools add the polish.
But remember — the goal isn’t to fix everything with editing. The goal is to enhance good performances and save decent ones. If you find yourself spending hours trying to fix a single vocal phrase, step back and consider whether a re-record would be faster and better.
Your vocals will thank you for it.
Want a professional starting point? My Vocal Magic presets give you ready-made vocal chains for any genre — EQ, compression, reverb, and more, all dialed in and ready to go.
Or grab my free vocal presets to try before you buy.
About Mattie
Mattie is a music producer, songwriter, and educator specializing in Logic Pro and vocal production. With over 10 years of experience in the music industry, he's helped thousands of artists transform their home studio recordings into professional-quality tracks.
As the founder of Music By Mattie, he creates tutorials, presets, and courses that simplify complex production techniques. His mission is to make professional music production accessible to everyone, regardless of budget or experience level.