
500 Hours of Music Production Tutorials in 27 Minutes
I've watched well over 500 hours of youtube production tutorials on the web, and I've learned a lot from them! Since then, I've started my own studio, quit my j

Key Takeaways
- Choose quality sounds from the start instead of trying to fix bad samples with processing.
- Set up reverb sends on dedicated bus tracks rather than adding reverb directly to each instrument.
- Use side-chaining to make competing elements work together instead of fighting for space.
- Keep arrangements simple with purpose - every sound should have a clear reason for existing.
- Automate parameters like volume and filters throughout your track to create movement and interest.
I’ve watched well over 500 hours of YouTube music production tutorials.
Not kidding. Every night for three years straight — diving deep into mixing techniques, arrangement tips, sound design secrets, you name it.
The result? I quit my job, started a full-time music studio, and actually got way better at making music. Like, way better.
Here’s the thing though — most of those 500+ hours were filled with fluff, outdated advice, and techniques that sound cool in theory but don’t actually move the needle.
So I’m cutting through all that noise. These 21 tips are the only ones that matter — the techniques that actually transformed my productions from amateur demos to professional tracks.
I also made a full video on this…
All the ideas in this article come from the video below. If you don't feel like reading, well, I gotchu.
1. Sounds Matter More Than You Think
This might sound obvious, but the sounds you choose are probably 70% of your final result.
I used to think I could fix any sound with processing. Bad piano sample? Just throw some EQ on it. Weak drum kit? Add some compression and call it a day.
Wrong. So wrong.
If your bass sounds like a wet fart, no amount of processing will save it.
The tracks I get sent now using some terrible stock piano plugin? It’s painful. You can hear the difference between a $20 Kontakt library and a carefully recorded Steinway from a mile away.
Your ears know quality when they hear it — trust them. If a sound makes you cringe slightly when you first load it up, find a better one. Don’t try to polish a turd.
Use good samples. Use good software instruments. Record with decent microphones. The rest of your production process becomes infinitely easier when you start with quality source material.
2. Bus Your Reverb (This Changes Everything)
Some DAWs call this an aux track, others call it busing — I call it essential.
Instead of slapping reverb directly on every track, create one dedicated reverb track and send your instruments to it.
Here’s why this technique is a game-changer:
Speed — Need reverb on your vocal? Just turn up a send knob. Done.
Processing efficiency — Instead of running 20 different reverb plugins, you’re running one or two.
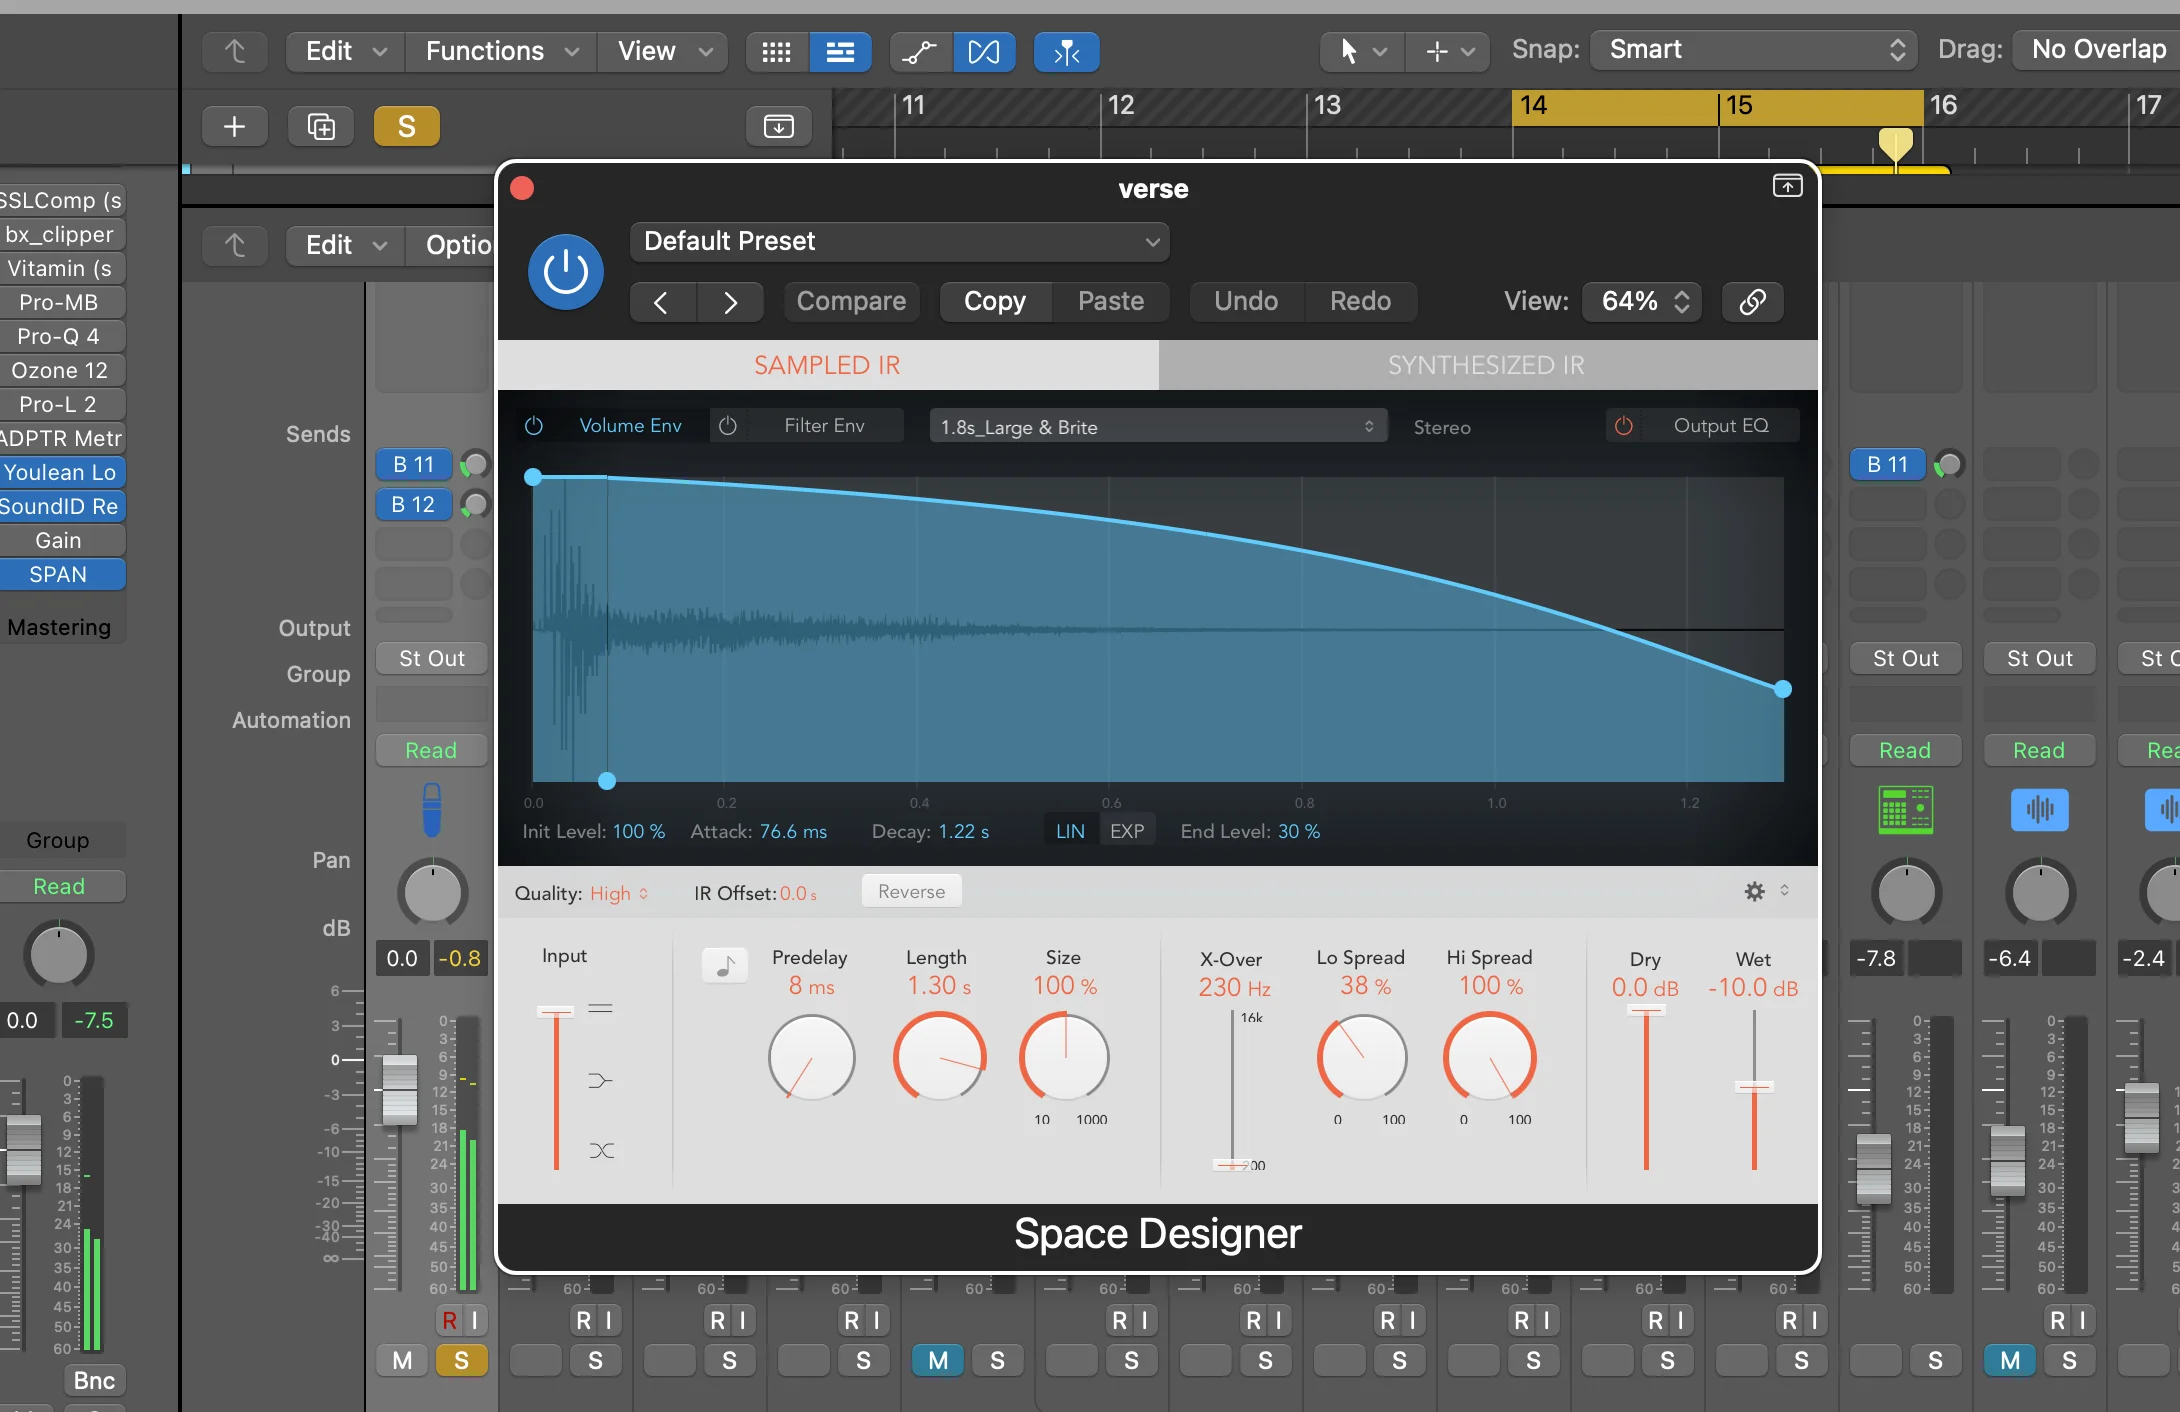
Audio connectedness — When all your instruments share the same reverb space, they blend together naturally. It’s like they’re all performing in the same room.
In Logic, click the empty space on your track where it says “sends,” choose an empty bus, and boom — you’ve got a reverb send. Set the reverb plugin to 100% wet (no dry signal), and now that send knob controls how much reverb each track gets.
This technique alone will make your mixes sound more cohesive and professional.
3. Side-Chaining is Your Secret Weapon
Side-chaining is when one sound automatically gets quieter whenever another sound plays.
Think about radio — when the DJ talks, the music ducks down automatically. Same principle.
The most common use? Kick and bass side-chaining. Both live in the low-end, and instead of letting them fight each other, you can make the bass duck slightly every time the kick hits.
But here’s where it gets interesting — you don’t have to side-chain the entire bass track. With multiband compressors like FabFilter Pro-Q 3, you can side-chain just the low frequencies. The bass stays punchy up top but makes room for the kick down low.
I use side-chaining on:
- Kick and bass (obviously)
- Multiple guitar layers
- Vocals and reverb
- Really anything that’s competing for space
It makes mixing so much easier because elements stop fighting each other and start working together.
4. Keep it Simple, Stupid (K.I.S.S.)
This isn’t just advice — it’s a survival skill.
When I first started making music, I’d throw everything at a track. Pad, brass section, string section, synth solo, guitar riff, and probably a kazoo somewhere in there.
The result? A cluttered mess that sounded like audio garbage.
Add elements with purpose. Every sound should have a reason for being there.
Here’s the test: Strip away all the extra layers. Is your song still good with just the core elements? If yes, great — now you can add tasteful embellishments. If no, you’re putting glitter on a turd.
Most hit songs are shockingly simple at their core. Four chords, a solid groove, and a memorable melody. Everything else is just decoration.
Stop overproducing. Stop adding four melodies simultaneously. Stop playing the most complex baseline when your vocal is trying to shine.
Keep it simple, stupid.
5. Organize Your Tracks and Songs (Future You Will Thank You)
I’m guilty as hell of this, but naming a song “coolbeat3” is not helpful.
If I had a nickel for every time I’ve clicked through folders looking for that one specific song with the perfect snare sound… I’d be retired by now.
Bad name: dopest_new_beat_final_FINAL
Good name: Travis_Scott_type_beat_135bpm_Eminor_Aug2024
See the difference? The second name tells me everything I need to know at a glance.
Also — and this is crucial — never name anything “final.” It’s like a curse. The moment you name something final, you’ll want to change it.
Use version numbers instead:
- Version_1.0
- Version_1.1
- Version_2.0
This has saved me countless hours of confusion.
Color-Coding Your Tracks
When I get serious about a mix, I use this color system:
- Red — Drums
- Orange — Bass
- Blue — Guitars and strings
- Green — Synths and keys
- Purple — Vocals
- Pink — Effects
This lets me open any project and instantly know what I’m working with. Less brain power spent figuring out what “Audio 27” is means more focus on actually making music.
Steal this system if you want — it works.
6. Music Theory is Your Friend (Not Your Enemy)
Look, music theory isn’t the popular kid at the school dance. But without theory, there wouldn’t be a dance at all.
You don’t need to learn music theory to make music. But you absolutely should if you want to get better faster.
Theory answers the hard questions:
- What melody should come next?
- Which chord progression fits this vibe?
- Why do these notes sound good together?
It’s not glamorous, but it’s incredibly practical. Instead of randomly trying different chords until something works, theory gives you a roadmap.
Even basic knowledge — like understanding scales, chord progressions, and intervals — will accelerate your songwriting exponentially.
7. Layer Your Sounds for Depth
Layering means using multiple instruments to play the same part.
Want a bass sound that no single bass plugin can give you? Combine the low-end of one bass with the high-end attack of another. Layer them on separate tracks and blend to taste.
Here’s what this sounds like in practice:
I might take a deep, sub-heavy 808 and layer it with a punchy electric bass. The 808 gives me that chest-thumping low-end, while the electric bass adds midrange definition and attack.
Pro tip: Use EQ to make your layers work together. If you only want the low-end from one layer, high-pass the other. If you want the attack from one and the sustain from another, use EQ and envelope shaping to carve out each layer’s role.
The result is a bass sound that’s bigger and more interesting than either source alone.
8. A Little Distortion Goes a Long Way
Most recordings have too much low-mid frequency content (around 200-500 Hz). It makes everything sound muddy and undefined.
Subtle distortion adds harmonics that fill out the frequency spectrum and give your tracks more life.
I’m not talking about cranking a distortion pedal to 11. I mean gentle saturation — just enough to add some analog warmth and harmonic content.
When you add subtle overdrive to a guitar, you’re not just making it louder or grittier. You’re adding upper harmonics that help it cut through the mix and sound more present.
This technique works on almost everything:
- Vocals (tape saturation)
- Drums (analog console emulation)
- Bass (tube warmth)
- Even full mixes (subtle master bus saturation)
The key word is subtle. You want to add life, not destruction.
9. Live Instruments Beat Virtual Instruments (When Possible)
I know this isn’t what you want to hear, but live instruments will always sound more energetic and human than their software counterparts.
Yes, software instruments are getting incredibly realistic. Yes, it’s easier to stay in the box. But there’s something inevitably human about a person playing a real instrument in a real room with real microphones.
Live instruments capture:
- Natural room acoustics
- Subtle timing variations (humans don’t play perfectly on the grid)
- Harmonic complexity from acoustic resonance
- The energy and passion of performance
If you can’t record live instruments, you can fake some of this humanization:
Timing: Select your MIDI notes and nudge them slightly off the grid. Drums pushed slightly ahead feel urgent. Drums pulled slightly back feel laid-back.
Velocity: Vary the velocity of your MIDI notes. Real drummers don’t hit every snare with identical force.
High hats especially benefit from live performance. Software hi-hats always sound programmed to me, but a real drummer playing real cymbals? Night and day difference.
All the best records use live musicians. All the top studios hire session players. There’s a reason for that.
10. Plan Out Your Arrangement
Your arrangement is how your song flows from section to section — verse to chorus to bridge and back.
The biggest problem I hear in amateur music? Complete lack of arrangement structure.
It’s one thing to know the rules and then break them creatively. It’s another thing to throw them out the window entirely.
Good arrangement is about emotional journey. You’re taking the listener on a roller coaster ride:
- Verse: More intimate, lower energy
- Pre-chorus: Building tension
- Chorus: Emotional payoff, full energy
- Bridge: Something different, contrast
- Outro: Resolution
If every section has the same energy level, you’re missing out on the emotional impact that comes from contrast.
Plan this out before you start producing. Know which sections will be sparse and which will be full. Know where you’re building energy and where you’re pulling back.
This planning makes every production decision easier.
11. Automation = Life (Seriously)
Automation means making parameters change over time. Volume going up, filters opening, reverb getting deeper — anything that moves.
If you’re not using automation, you’re not producing at a professional level.
The most common automation is volume, but here’s a critical tip: Don’t automate the track fader directly. Instead, put a Gain plugin after your other effects and automate that.
Why? Because if you automate the fader, you can’t use it for manual adjustments later. Automate the gain plugin, and your fader stays free.
My Favorite Automation Tricks
Low-pass filter sweeps: Automate a low-pass filter to open up gradually during a build-up. Creates massive energy and anticipation.

Reverb sends: Automate reverb sends to make vocals jump between intimate and spacious.
Delay throws: Automate delay sends on the last word of vocal phrases for ear candy.
Gain riding: Subtle volume automation to keep vocals sitting perfectly in the mix.
Use your DAW’s “latch” mode to record automation in real-time. Play your track and move parameters with your mouse — the automation gets recorded automatically.
More automation = more interesting tracks. Period.
12. Drop Out the Low End for Impact
This goes hand-in-hand with arrangement planning.
If you drop out your low-end completely, then bring it back, it hits exponentially harder.
In one of my recent tracks, I remove the bass entirely during the pre-chorus. When the chorus hits and that bass comes back in, it feels massive — not because the bass got louder, but because of the contrast.
This works with any frequency range:
- Drop out drums for a bar, then bring them back
- Remove all the high frequencies, then open them back up
- Cut everything but vocals and one instrument, then explode back to full arrangement
The absence makes the return feel bigger. Use this technique strategically and your choruses will hit like trucks.
13. Carve Out Space for Each Instrument
Think of the frequency spectrum like a puzzle. Each instrument needs its own piece of the puzzle to sit comfortably.
If everything lives in the same frequency range, everything sounds muddy.
Here’s a rough guide:
- Kick drum: 60-100 Hz (sub-bass) + 2-5 kHz (click/attack)
- Bass: 80-250 Hz
- Guitars: 200 Hz-5 kHz
- Vocals: 1-8 kHz (fundamental) + presence around 5-8 kHz
- Cymbals/air: 8 kHz and up
Use EQ to carve out space. If your bass and kick are fighting, try cutting some 80-120 Hz from the bass and boosting it slightly in the kick.
If your guitar and vocal are competing, try cutting some 2-3 kHz from the guitar to make room for the vocal’s presence.
The goal isn’t to make each instrument sound good in solo — it’s to make them work together as a team.
14. Stop Soloing (This is Crucial)
Nobody listens to music with one instrument soloed.
I see this mistake constantly. Producers will solo the kick drum, EQ it until it sounds perfect in isolation, then wonder why it doesn’t work in the full mix.
The only time you should solo is to:
- Check for technical issues (clicks, pops, noise)
- Identify which instrument is causing a problem
- Set up processing that needs to be heard in isolation
For everything else — mixing, EQ, compression, effects — keep everything playing together.
Just because something sounds good soloed doesn’t mean it’ll work in context. And just because something sounds weird soloed doesn’t mean it’s wrong in the mix.
Your mix is a team sport. Make decisions with the full team playing.
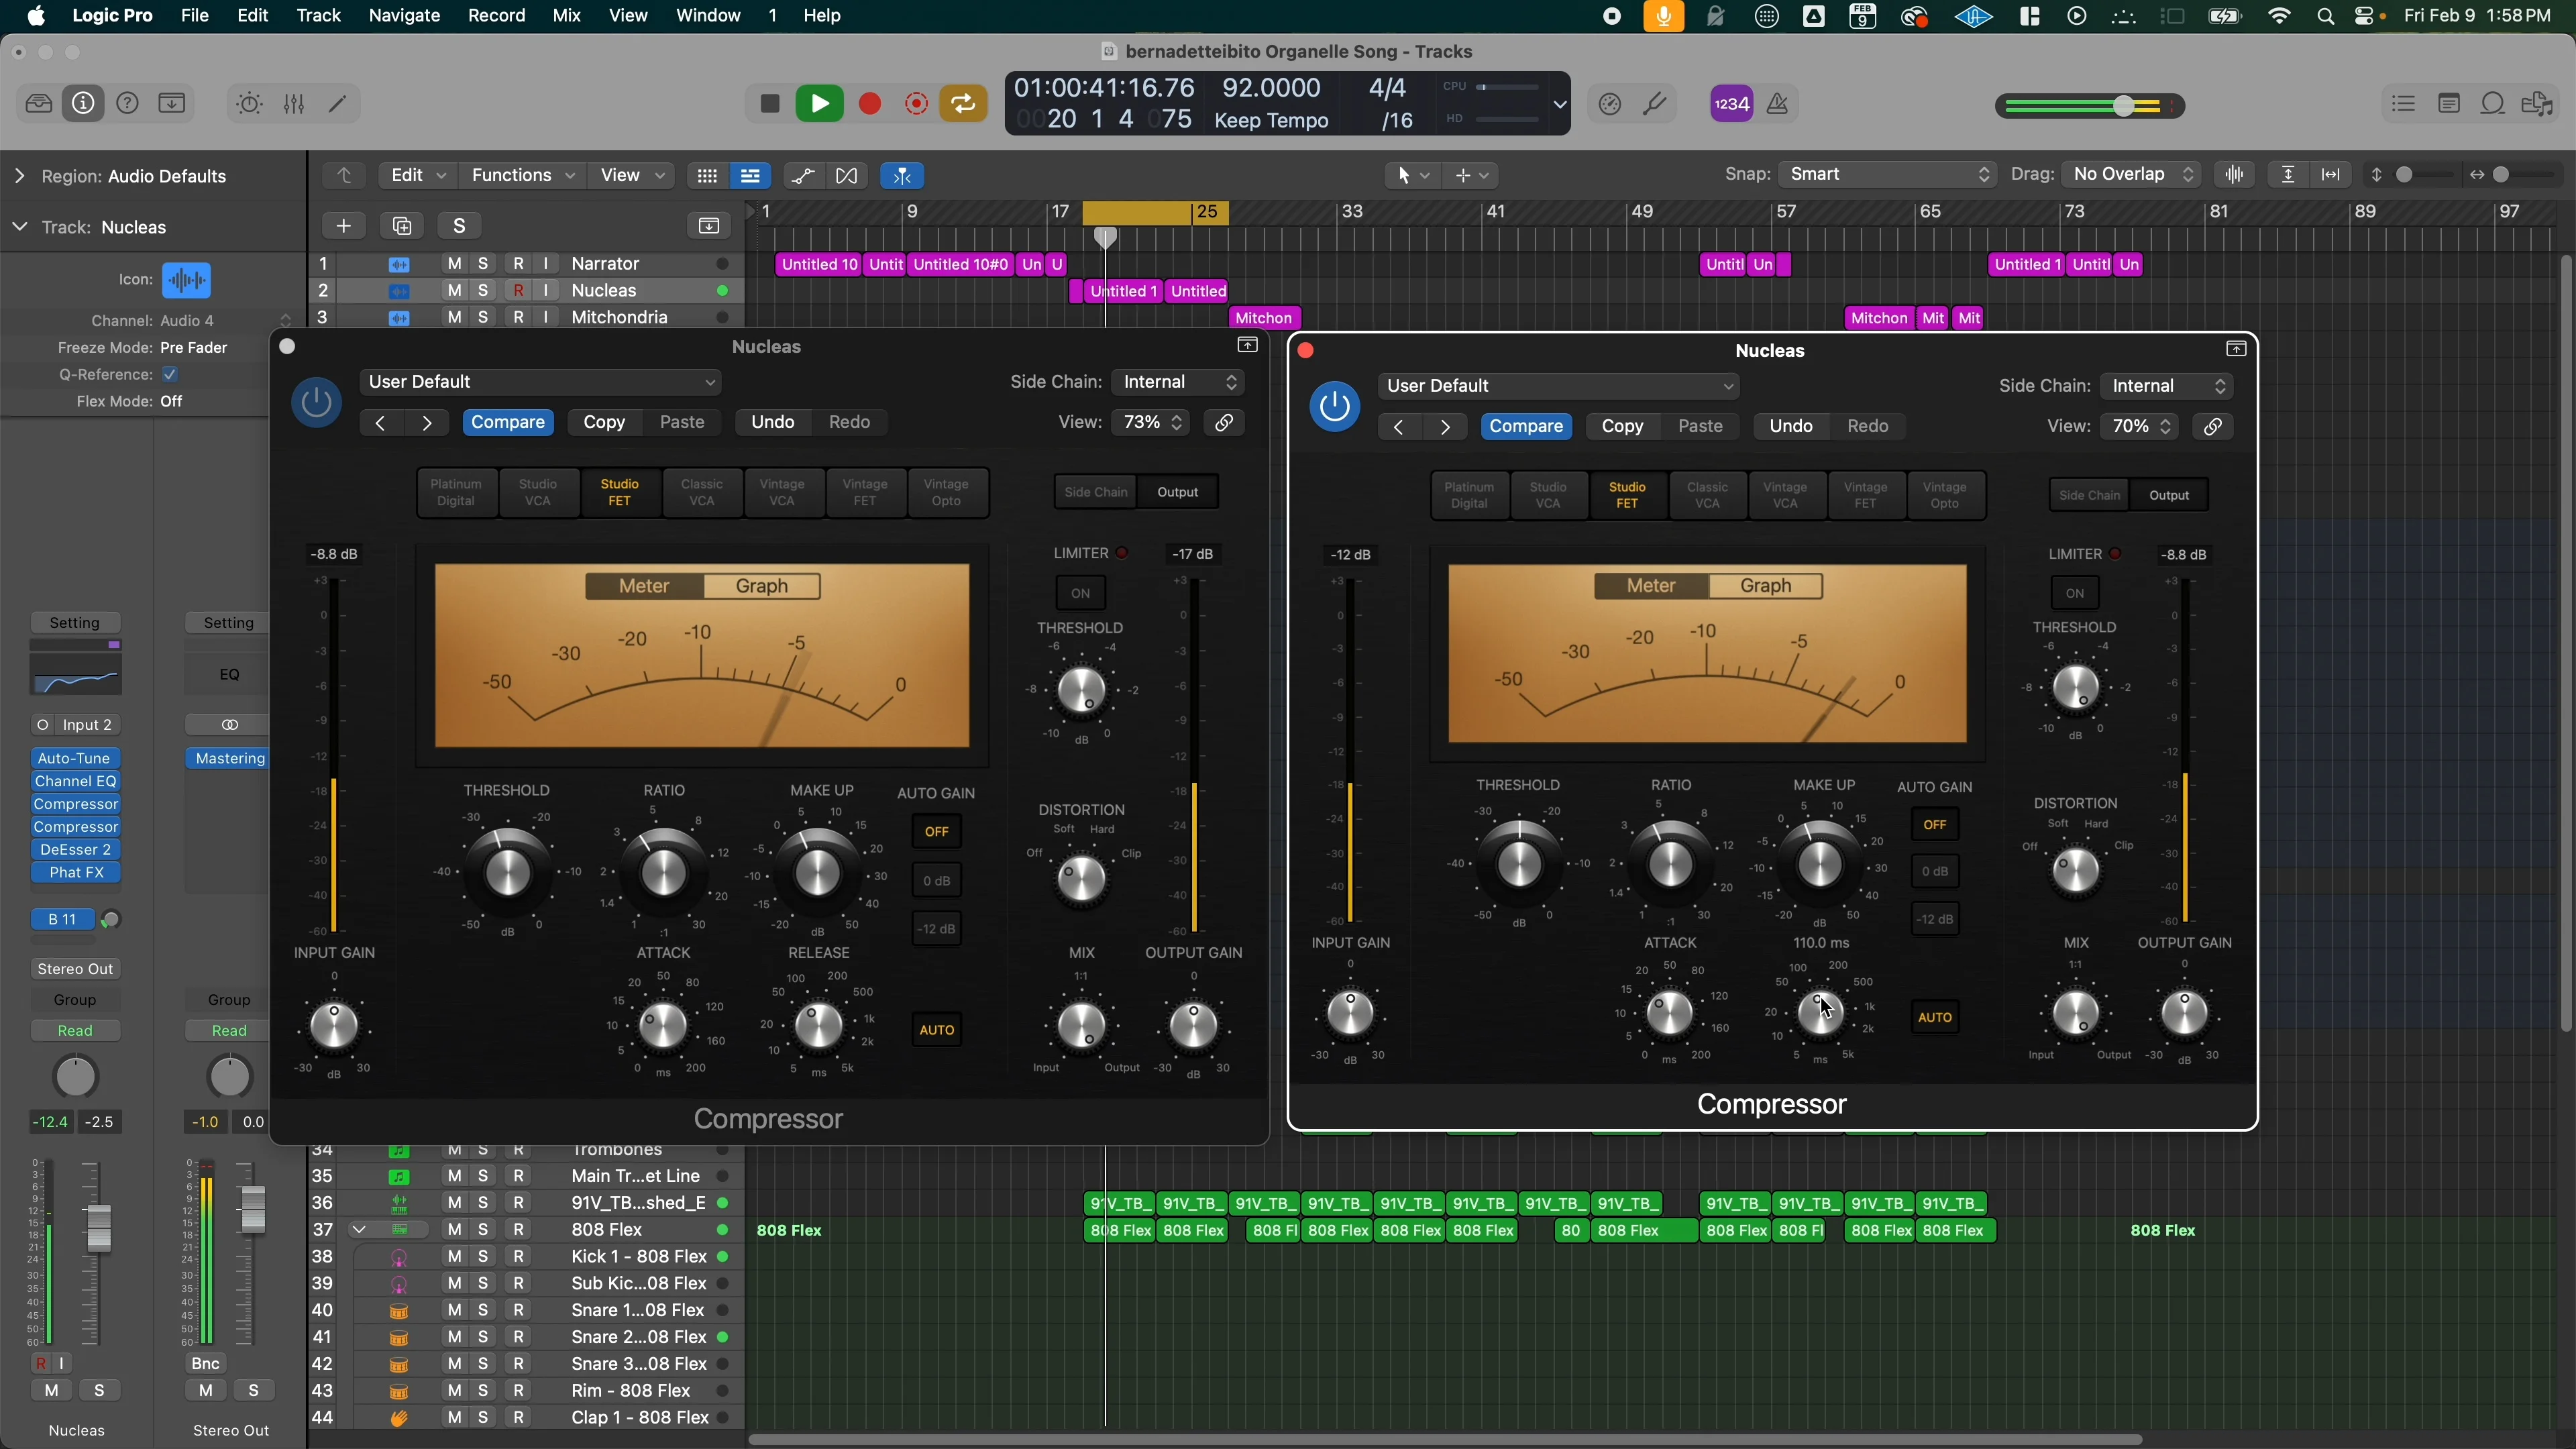
15. Parallel Compression Sounds More Natural
Parallel compression (also called “New York compression”) is when you blend a heavily compressed version of a signal with the original uncompressed version.
Why is this better than regular compression? Because you get the benefits of compression (consistency, punch, sustain) without losing the natural dynamics and transients of the original performance.
The Old Way
Duplicate your track, compress the hell out of the duplicate, then blend it with the original to taste.
The New Way
Most modern compressors have a “mix” knob. Compress normally (or even overdo it slightly), then use the mix knob to blend in the compressed signal with the dry signal.
This technique works incredibly well on:
- Drums (especially snare)
- Vocals
- Bass
- Even full mix buses
The result sounds more natural and musical than straight compression.
16. Chain Compressors for Natural Results
Instead of using one compressor with a high ratio (like 8:1), try using multiple compressors with gentle ratios (like 2:1 or 3:1) in series.
Why does this work better?
Heavy compression from a single compressor can suck the life out of a performance. But gentle compression from multiple units preserves more of the original dynamics while still controlling peaks.
I typically aim for no more than 2-3 dB of gain reduction per compressor. If I need more control than that, I’ll add another compressor in the chain.
This is how classic records were made — signals would pass through multiple pieces of analog gear, each adding gentle compression and coloration.
The cumulative effect is controlled dynamics that still sound alive and breathing.
17. Don’t Clip (Ever)
Clipping is audio death. Once you clip during recording, that information is gone forever. You can’t fix it in post.
Watch your input levels when recording. I like to see peaks hitting around -6 to -12 dBFS — hot enough for good signal-to-noise ratio, but with plenty of headroom for unexpected peaks.
For your mix bus, aim for around -6 to -8 dBFS before mastering. This gives your mastering engineer (or yourself) plenty of room to work without running into digital distortion.
Clipping during recording = re-recording the part.
Clipping on your mix bus = turn everything down.
There’s no fixing clipped audio. Prevention is the only cure.
18. Master to At Least -14 LUFS (But Probably Louder)
I used to think -14 LUFS was the magic number because that’s where streaming platforms normalize content.
I was wrong.
-14 LUFS is the minimum, not the target.
Here’s what actually happens: Spotify and other platforms turn down tracks that are louder than -14 LUFS. But if someone has normalization disabled (which many serious listeners do), your -14 LUFS track will sound quiet compared to a -9 LUFS track.
Louder sounds better — it’s an unfortunate truth about human hearing.
For competitive genres like EDM, hip-hop, and pop, I now master to:
- -9 to -11 LUFS for aggressive, in-your-face genres
- -11 to -13 LUFS for more dynamic content
- -14 LUFS only for very dynamic, acoustic-based music
Use a LUFS meter (I recommend the free Youlean Loudness Meter) on your master bus, add a limiter, and push your levels to be competitive with your reference tracks.
Remember: the louder you go, the more compressed and less dynamic your track becomes. Find the sweet spot for your genre.
19. The Rules Don’t Matter if it Sounds Good
This is the most important tip on the entire list.
If it sounds good, it IS good.
Every “rule” I’ve mentioned — side-chaining, EQ techniques, compression ratios — these are guidelines, not commandments.
If you try side-chaining your kick and bass and it sounds worse, don’t do it. If your mix sounds better when you break conventional EQ wisdom, trust your ears.
The only thing that matters is the final result. Does your track sound good? Does it make people move? Does it create an emotional response?
If yes, you’ve succeeded — regardless of which rules you followed or broke.
20. Use Reference Tracks (This is Non-Negotiable)
Reference tracks will improve your productions faster than any other single technique.
Choose 3-5 songs in your genre that you absolutely love. Use them as a guide for:
- Sound selection (what kind of kick do they use?)
- Arrangement (how do they structure their verses and choruses?)
- Mix balance (how loud are the vocals relative to the music?)
- Frequency balance (how much low-end vs. high-end?)
- Dynamics (how compressed vs. dynamic?)
Critical mistake: Make sure your reference tracks are the same volume as your work-in-progress. Master tracks are loud, your rough mix isn’t. If you don’t level-match, your brain will automatically think the louder reference sounds better.
I use Metric AB for automatic level matching, but you can do it manually with a gain plugin.
Study your references obsessively. They’re showing you exactly what professional quality sounds like in your genre.
21. Videos Won’t Row Your Boat
This last tip is probably not what you want to hear, but it’s the most important.
No amount of YouTube tutorials can substitute for actually making music.
You can watch every mixing video ever made, but until you spend hours behind the speakers — making mistakes, training your ears, developing your instincts — you won’t get where you want to go.
Videos can teach you techniques, but they can’t teach you:
- How compression actually sounds on different sources
- How to develop your taste and aesthetic
- How to hear a song in your head and translate it to reality
- When to break the rules for creative effect
Quantity begets quality. The more music you make, the better you inevitably get.
So here’s my challenge: Take these 21 tips, pick three that resonate with you, and go apply them to a song today. Don’t wait until you’ve watched more tutorials. Don’t wait until you have better gear.
Start now. Make music now. Get better now.
These 21 tips represent hundreds of hours of learning condensed into actionable advice. But remember — information without application is just entertainment.
The only way these techniques become part of your toolkit is by using them. So stop watching and start creating.
Your future self will thank you for taking action today.
📚 More in the Music Production & Tools Series
Want a professional starting point? My Vocal Magic presets give you ready-made vocal chains for any genre — EQ, compression, reverb, and more, all dialed in and ready to go.
Or grab my free vocal presets to try before you buy.
About Mattie
Mattie is a music producer, songwriter, and educator specializing in Logic Pro and vocal production. With over 10 years of experience in the music industry, he's helped thousands of artists transform their home studio recordings into professional-quality tracks.
As the founder of Music By Mattie, he creates tutorials, presets, and courses that simplify complex production techniques. His mission is to make professional music production accessible to everyone, regardless of budget or experience level.