![Pro Producer Explains Every Plugin in Logic Pro 11 [Part 1] - Logic Pro tutorial by Music By Mattie](/images/blog/covers/logic-pro-11-plugins.webp)
Pro Producer Explains Every Plugin in Logic Pro 11 [Part 1]
There's a metric ton of plugins in Logic, and deducing what they might do would better left to Sherlock Holmes... or Mattie? In this video, I'll walk you throug

Key Takeaways
- Start with presets on every Logic plugin to learn settings before customizing anything yourself.
- Logic's stock delays work best when you bandpass the filter to avoid competing with vocals.
- Use Stereo Delay as your go-to because it creates natural width with different timing per channel.
- Sample Delay's Haas effect creates stereo width, but always check your mix in mono afterward.
- Logic's amp designers let you record guitar DI and add character later without angry neighbors.
Logic Pro comes loaded with over 50 stock plugins — I counted them myself because apparently that’s what I do for fun.
That’s a metric ton of effects to wrap your head around, especially if you’re just starting out. Which is exactly why I’m breaking down every single plugin in Logic and explaining when I use it, why I’d use it, and how to actually make it sound good.
We’re going to tackle this in parts because — let’s be real — nobody wants to sit through a 3-hour video. This is Part 1, covering amps and pedals, delays, and distortion. Part 2 is coming next week, so hit subscribe if you don’t want to miss it.
I also made a full video on this…
All the ideas in this article come from the video below. If you don't feel like reading, well, I gotchu.
Part of the DAWs & Production Software series — For the full picture, read my full DAW comparison guide.
Getting Into Logic’s Effects
Before we dive in, here’s how to actually access these plugins.
Hit I on your keyboard to unlock the track you have selected and see its effects. Or press X to open the mixer window with every track in your mix.
Click into Audio Effects, then Logic. I’ve customized these folders to my liking, so some plugins you might not see. If you want the default Logic folders, just scroll down to the Logic section.
Time to get into it.
Amps and Pedals
Amp Designer — Your Virtual Guitar Amp
Amp Designer is exactly what it sounds like — amp emulation software that makes your DI guitar sound like it was recorded through an actual amp.
These days, most people record guitar straight into their audio interface and add the amp character later using plugins like this. Way more flexible than mic’ing up a real amp, and your neighbors won’t hate you.
Like almost every Logic plugin, you can find presets at the top. For this demo, I’m looking for a clean sound, so I’ll choose Creamsicle Clean.
Pro tip: Alt-click on volume faders to bring them straight to 0dB. I do this constantly.
The sound works for what I need. If I want to customize it further, I can change:
- The amp model — different vintage and modern amp emulations
- The cabinet — various speaker cab simulations
- The microphone — emulations of popular studio mics
- Mic positioning — closer to the speaker cone gives more bass, further away gives less
You can even adjust the EQ just like you would on a real amp. It’s basically having a full amp setup, but in plugin form.
To duplicate this setting on another guitar track (because I double-tracked), I’ll pull up the mixer with X, hold Option, and click-drag the plugin over. Now both tracks have identical settings, and I can pan them hard left and right for that wide stereo guitar sound.
Bass Amp Designer — Same Concept, Different Frequencies
Bass Amp Designer works just like the guitar version, but it’s designed for bass frequencies.
You get different amp models specifically tailored for bass — not as many options as the guitar amps, but honestly, for bass you want to keep things simple anyway.
Same deal with cabinets, microphones, EQ, compression, and gain controls. Most bass amps also have a bright knob for adding some high-end sizzle.
Just like before, start with presets and tweak from there.
Pedalboard — Build Your Virtual Rig
Here’s where things get fun. Pedalboard lets you create custom effect chains just like you would with real guitar pedals.
For this demo, I’m grouping my guitar tracks together so I can process them simultaneously. Saves time from copying the pedalboard to each individual track.
Normally, pedals would go before the amp in your signal chain, but I’m putting mine after because — why the hell not? Logic gives you the flexibility.
You can start with presets like Crispy Field or Fizzy Fuzz, or build your own custom pedalboard by dragging effects from the library.
Each pedal can be turned on/off independently, and you can adjust parameters like:
- Drive — how much distortion/overdrive
- Level — output volume
- EQ controls — varies by pedal type
The pedals are organized by category: delays, filters, modulations, pitch effects, etc. Let me demonstrate with an octave pedal from the pitch section.
You can hear that lower octave doubling the guitar and beefing up the tone. To remove a pedal, just drag it to the trash.
Key point: These pedals are designed specifically for guitars and focus heavily on the mid-range frequencies where electric guitars shine. If you’re not a guitarist, don’t stress too much about this — you’ll learn these effects as we go through the individual plugins anyway.
Stompboxes — Individual Pedal Control
Stompboxes lets you use any individual pedal as a standalone plugin. This gives you more control over your signal chain and lets you insert other plugins between pedals.
For example, I can throw in a Grit pedal here and have full control over its placement in my effects chain.
I don’t use this approach super often — if I’m going for pedal effects, I usually just use the full Pedalboard. But it’s there if you need that level of control.
Delays — The Art of the Echo
Think of delay as the repeat of your original sound. Like shouting into the Grand Canyon and hearing “echo… echo… echo…” trailing off into the distance.
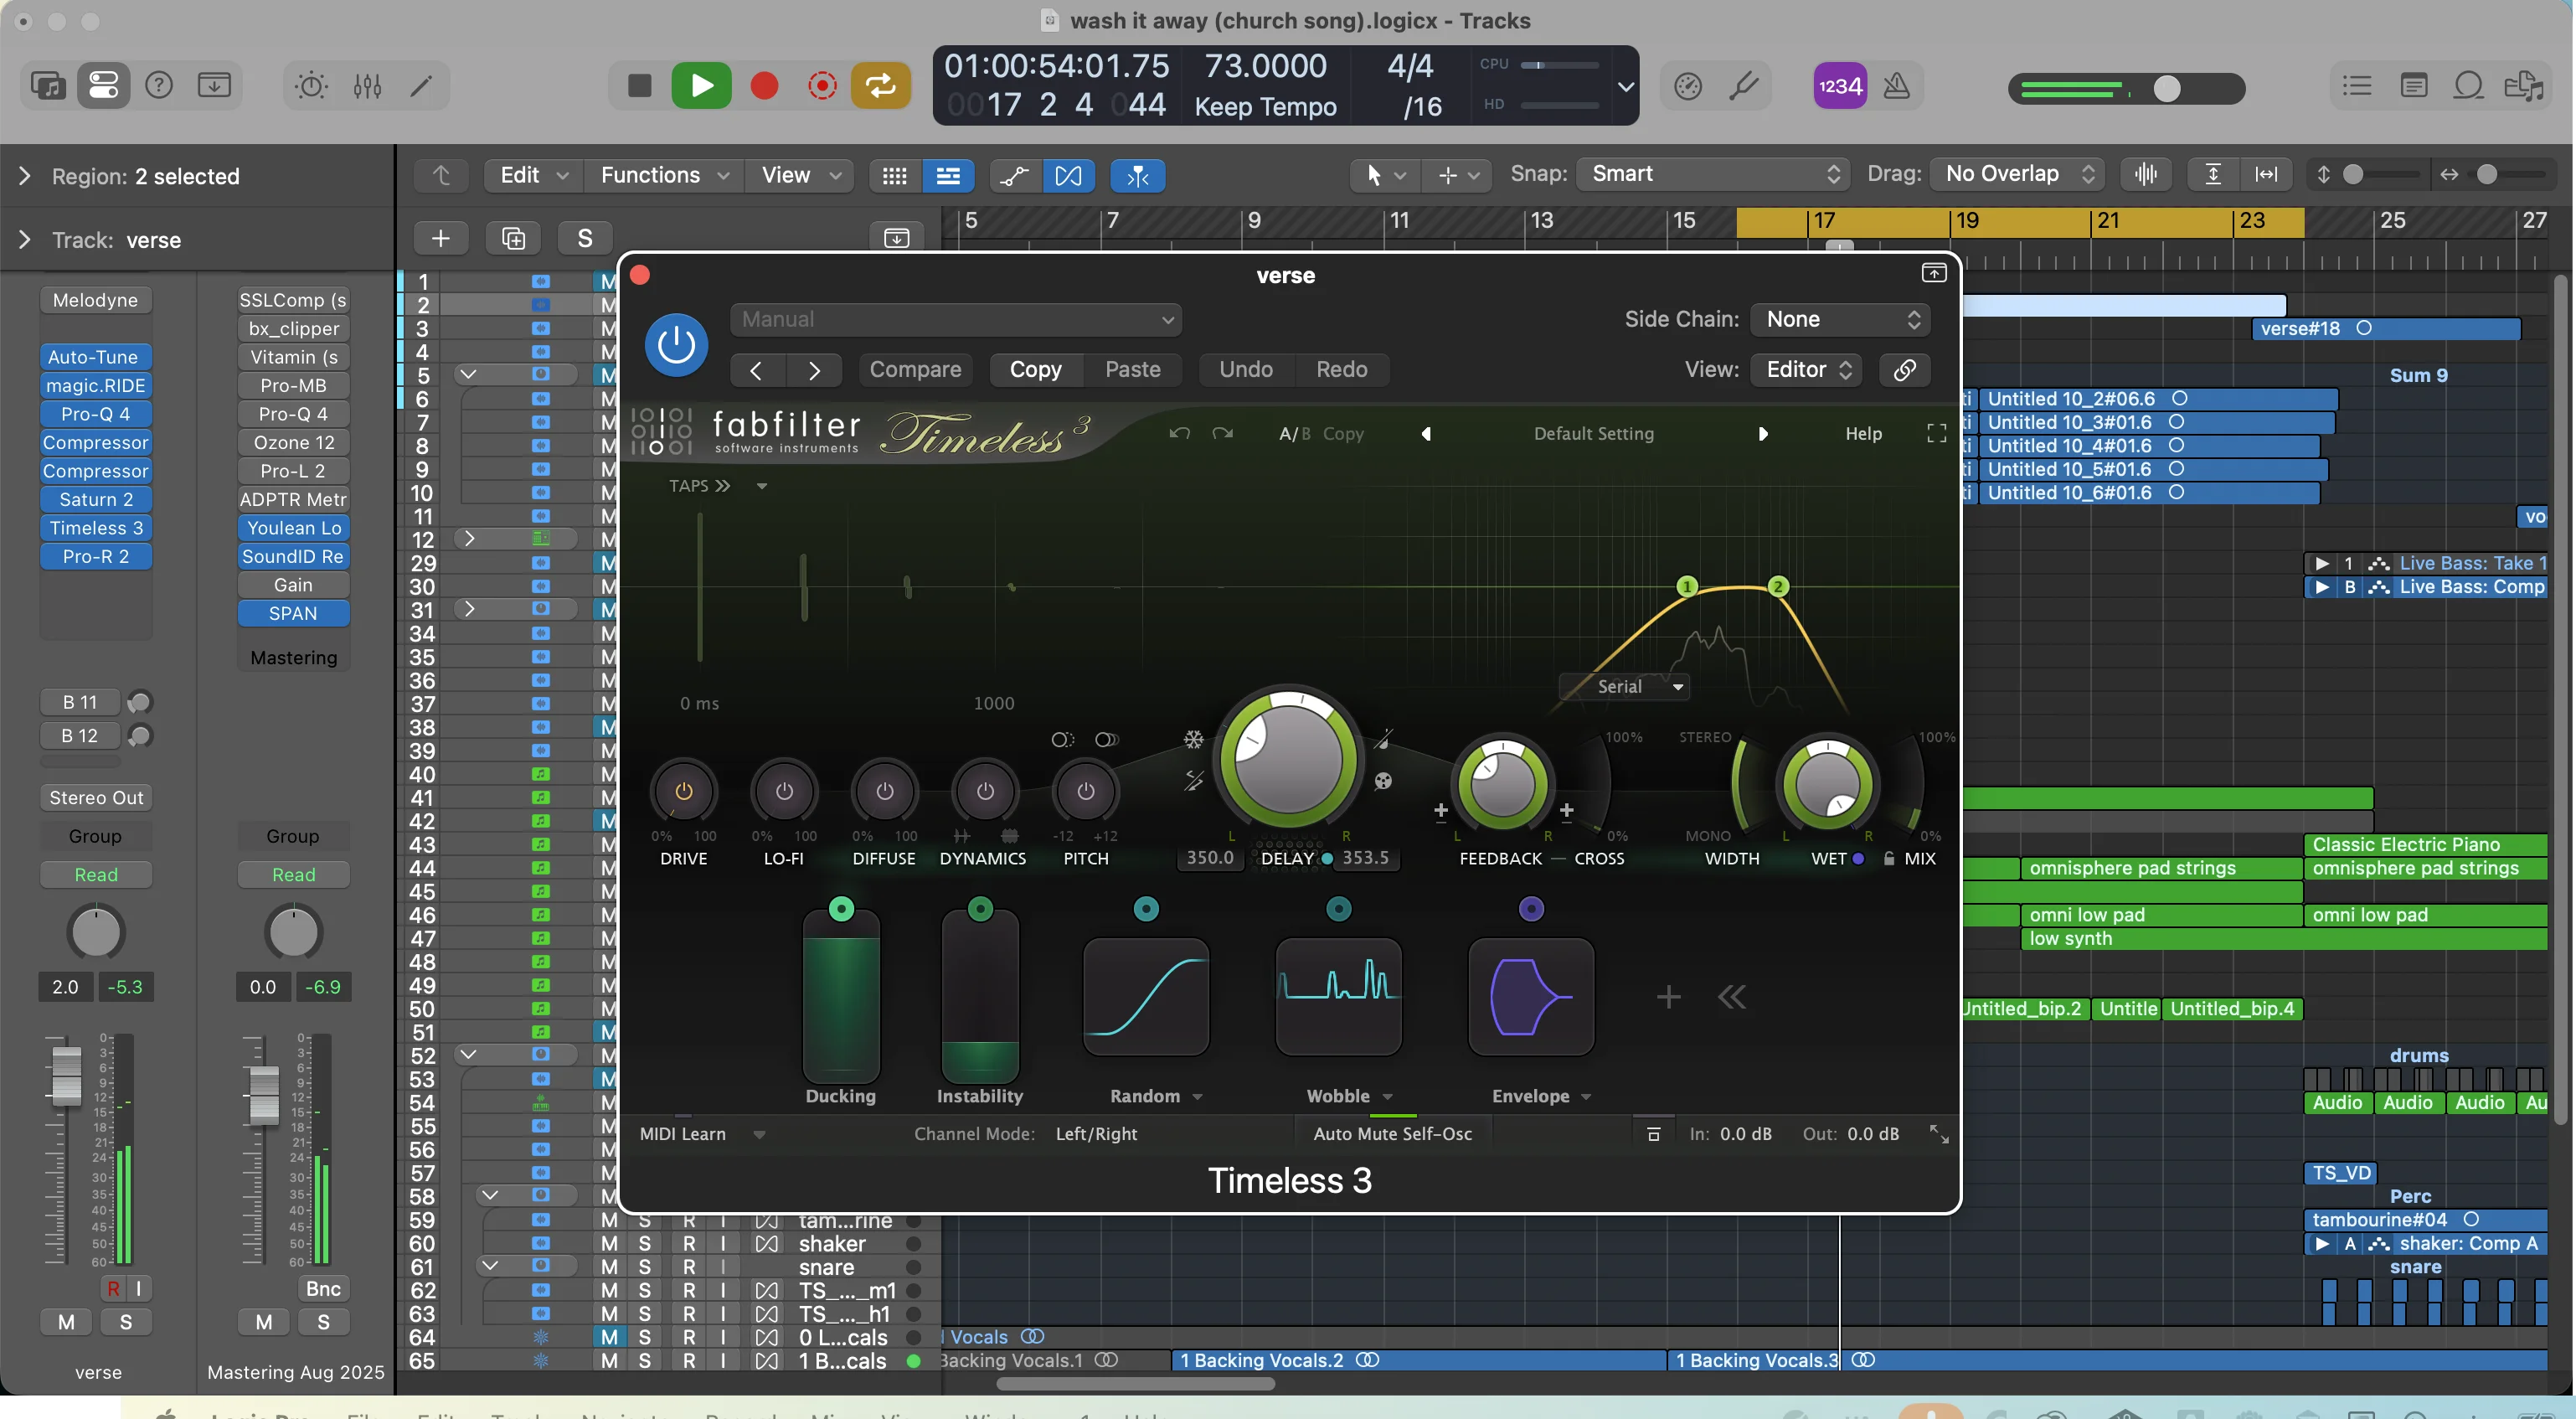
Delay Designer — The Complicated Beast
Delay Designer might be the most complex delay in Logic, but since we’re going in order, let’s tackle it first.
I always recommend starting with presets, especially with Delay Designer. Let’s try 1/4 Note Slow Pan.
This preset creates a quarter-note delay that slowly pans from left to right. You can see the individual delay taps represented as dots on the interface.
Each tap has its own controls:
- Pan — left to right positioning
- Cutoff — high-frequency filtering
- Resonance — emphasis around the cutoff frequency
- Transpose — pitch shifting for each tap
- Volume — level of each repeat
The volume getting quieter with each repeat is crucial for natural-sounding delays. If we boost the later taps too much, it gets messy fast.
You can change the delay timing from quarter notes to sixteenths, eighths, whatever you need. The faster settings create more rhythmic, percussive delays.
The most important controls are the Dry and Wet knobs. Since I’m using this on a send/return, I’ll set Dry to 100% and Wet to 0%, then mix in the wet signal to taste.
This is a solid strategy for any ambient effects that use wet/dry controls — keep the dry at 100% and mix in the wet to taste.
Delay Designer has tons of advanced options, but I wouldn’t recommend it for beginners. Let’s look at simpler options.
Echo — Simple and Effective
Echo is exactly what it sounds like — a straightforward delay that repeats your signal.
The key parameters you need to know:
- Dry/Wet — balance between original and delayed signal
- Feedback — how many repeats before they fade away (100% feedback = infinite repeats)
- Delay Time — timing of the repeats (eighth notes, quarter notes, etc.)
The Color knobs shape the frequency content of the delays. High Color emphasizes the treble frequencies, Low Color emphasizes the bass. This is just EQ’ing your delay returns.
Echo is perfect for beginners — simple, effective, sounds great.
Sample Delay — The Haas Effect Specialist
Sample Delay is very specific, and I use it almost exclusively for one thing: creating Haas delays.
A Haas delay takes a mono signal and delays one channel by a small amount (usually 10-60 milliseconds) to create the illusion of stereo width.
Here’s how I set it up:
- Put the source track in the center (Option-click the pan to reset to 0)
- Set Sample Delay to milliseconds mode
- Delay the right channel by about 60 milliseconds
What happens is the mono signal reaches your left speaker 60 milliseconds before your right speaker. Your brain interprets this as a wider, more spacious sound.
Warning: Be careful with this technique. Always check your mix in mono to make sure you’re not creating phase problems.
Stereo Delay — My Go-To Choice
Stereo Delay is my most-used delay in Logic, and for good reason.
It’s actually two separate delays — one for left, one for right — which creates natural stereo width and movement.
The default settings are something I use constantly: one side set to eighth notes, the other to quarter notes. This difference between left and right creates that stereo width you’re after.
Each side has independent controls:
- Feedback — number of repeats per channel
- Output — level control (treat this as your wet knob)
- Filter — this is huge
That Filter knob is like having a built-in EQ on your delays. You get both high-cut and low-cut filters, essentially a bandpass that you can adjust to taste.
I use this filter constantly to make delays sit better in the mix. By heavily bandpassing them to focus on mids or high-mids, the delays add rhythmic interest without stepping on the main vocal or lead instruments.
It’s still got the groove, still has that delay feel, but doesn’t stick out and compete for attention.
Tape Delay — Vintage Flavor
Tape Delay emulates the old analog tape delays from back in the day, when engineers would run signals through tape machines to create delay effects.
These vintage units added their own character — distortion, modulation, and general “weirdness” that became part of their charm.
The Modulation section emulates that vintage behavior with flutter and wow effects. This is basically a low-frequency oscillator (LFO) that can sync to your song tempo if you want.
When I do use Tape Delay, I usually turn off all the modulation effects. I prefer third-party plugins for tape emulation — they tend to be more prominent and easier to use.
But Tape Delay does have some cool features:
- Character knob for different tonal flavors
- Spread for wider stereo spectrum
- Diffuse/Clean modes for different textures
Just be careful with the spread function — always check in mono to avoid phase issues.
I use this less than the other delays, but it’s great when you want that degraded, vintage sound as part of the effect.
Distortion — Adding Harmonic Content
Time to get aggressive. Distortion plugins add harmonic content and saturation to make things sound more exciting, punchy, or just plain nasty.
Bitcrusher — 8-Bit Video Game Vibes
Bitcrusher takes your audio and crushes it down, literally destroying the signal to create that classic 8-bit video game sound.
You can actually see this happening visually — the smooth audio waveform turns into chunky, pixelated square waves.
The main controls:
- Down Sampling — how much you destroy the sample rate
- Resolution — bit depth reduction (lower = more distorted)
- Drive — additional clipping for extra aggression
Lower resolutions give you that really crunchy, digital distortion. Higher resolutions sound closer to the original signal.
The Mode setting changes how the distortion behaves:
- Clipping — cuts off the peaks
- Wrapping — brings overloaded signals back down
- Folding — folds overloaded signals back in the opposite direction
Bitcrusher has a very specific sound to my ears — great for that retro gaming aesthetic, but I usually reach for other distortion types for more musical applications.
ChromaGlow — The AI-Powered Newcomer
ChromaGlow is Logic’s newest distortion plugin, supposedly using AI to emulate analog tube effects. I honestly don’t know what’s happening under the hood, but Logic says it’s AI, so there you go.
You can switch between different models:
- Retro — vintage tube sound
- Tube — classic tube saturation
- Mono Tube — single-tube character
The Colorful/Clean knob adjusts how much character gets added. You can also bypass the low end by adjusting the frequency cutoff — great for keeping your low end clean while adding harmonic excitement to the mids and highs.
The presets are actually really good. Crunchy Distortion gives you exactly what you’d expect, though watch out for the heavy bandpassing on some presets.
To reset to default settings, just click Recall Default at the top.
ChromaGlow is fairly new, so if you haven’t updated to Logic 11, you won’t have it. But it’s become one of my favorites for subtle analog-style saturation.
Clip Distortion — Clean and Controlled
Clip Distortion does exactly what the name suggests — it clips your signal by cutting off the peaks of the waveform.
You can visualize this happening if you remember the Bitcrusher — any audio that crosses the threshold gets chopped off, creating new harmonic content.
The controls are straightforward:
- Drive — how much signal you’re pushing into the clipper
- Tone — EQ-style filtering (though it’s hard to see the curve)
- Mix — wet/dry blend
That Mix knob is crucial. At 100%, you get pure clipped signal. Lower settings let you blend the distorted signal with the clean signal for more subtle effects.
The low-pass filter helps tame the high-frequency harshness that clipping can create. I usually start with it full open and then dial it back if needed.
Distortion I vs. Distortion II — The Old and the New
Distortion I is the older plugin. It has a low-pass filter that defaults to 2kHz, which I find annoying. I usually max it out first, then adjust downward if needed.
Distortion II is my preferred choice. It’s simpler and sounds better to my ears.
The main controls are:
- Pre-Gain — input level
- Drive — amount of distortion
- Tone — frequency emphasis
Click the arrow to reveal additional options, including different distortion types:
- Class A Soft — gentle, warm distortion
- Class AB Hard — more aggressive
- Nasty — exactly what it sounds like
The Tone knob works like a tilt EQ — higher settings emphasize treble, lower settings emphasize the low-mids.
Don’t forget about the Mix knob for blending distorted and clean signals.
If you’re a beginner, start with Distortion II. It’s simple, sounds great, and doesn’t overwhelm you with options.
Overdrive — Subtle Harmonic Enhancement
Overdrive might actually be my favorite distortion plugin in Logic. It’s all about subtlety.
The controls are dead simple:
- Drive — amount of overdrive
- Tone — frequency emphasis
- Output — level control
What I love about Overdrive is how subtle it is. You’re not getting obvious distortion — you’re getting harmonic enhancement and gentle compression that makes everything sound more exciting.
I use this constantly in my mixes for adding warmth and presence without obvious distortion artifacts. It’s that secret sauce that makes things sound more “produced” without being obvious about it.
Phase Distortion — The Weird One
Phase Distortion works by altering the phase relationships in your audio signal. To be honest, I don’t use this much, so I can’t speak to all the technical details.
What I can tell you is it creates some really unique sounds that you can’t get with other distortion types. The presets show some extreme examples of what’s possible.
This is the distortion plugin I use least, but it’s there if you need something truly different and weird.
Wrapping Up Part 1
That covers amps and pedals, delays, and distortion — three huge categories of Logic’s stock plugins.
Key takeaways:
- Start with presets on every plugin — they’re your launching pad
- Amp Designer and Bass Amp Designer are perfect for home recording
- Stereo Delay is the most versatile delay for mixing
- Overdrive adds subtle harmonic enhancement to everything
- Sample Delay is amazing for creating stereo width with the Haas effect
Part 2 is coming next week, where we’ll tackle EQ, dynamics, modulation, and all the other categories. Hit subscribe so you don’t miss it.
The stock plugins in Logic are seriously powerful — you could make professional-sounding records with just these tools. But first, you need to know what they actually do.
That’s why we’re going through every single one.
Want a professional starting point? My Vocal Magic presets give you ready-made vocal chains for any genre — EQ, compression, reverb, and more, all dialed in and ready to go.
Or grab my free vocal presets to try before you buy.
About Mattie
Mattie is a music producer, songwriter, and educator specializing in Logic Pro and vocal production. With over 10 years of experience in the music industry, he's helped thousands of artists transform their home studio recordings into professional-quality tracks.
As the founder of Music By Mattie, he creates tutorials, presets, and courses that simplify complex production techniques. His mission is to make professional music production accessible to everyone, regardless of budget or experience level.