How to Get Pro Vocals in Logic Pro in 123 Seconds
Professional vocals don't have to be hard to get! If you've got a good vocal recording, then getting a pro sound is well within your grasp! Follow this quick ch

Key Takeaways
- Logic Pro's stock plugins can deliver professional-quality vocals without expensive third-party gear.
- Set your vocal level to -18 LUFS before processing for consistent plugin performance.
- Use two moderate compressors in series instead of one heavy compressor for natural sound.
- High-pass around 80-120 Hz and cut muddy frequencies around 300-800 Hz surgically.
- Good recording quality is essential — no amount of processing fixes bad performance.
Professional vocals don’t have to be complicated — but most producers are doing it wrong.
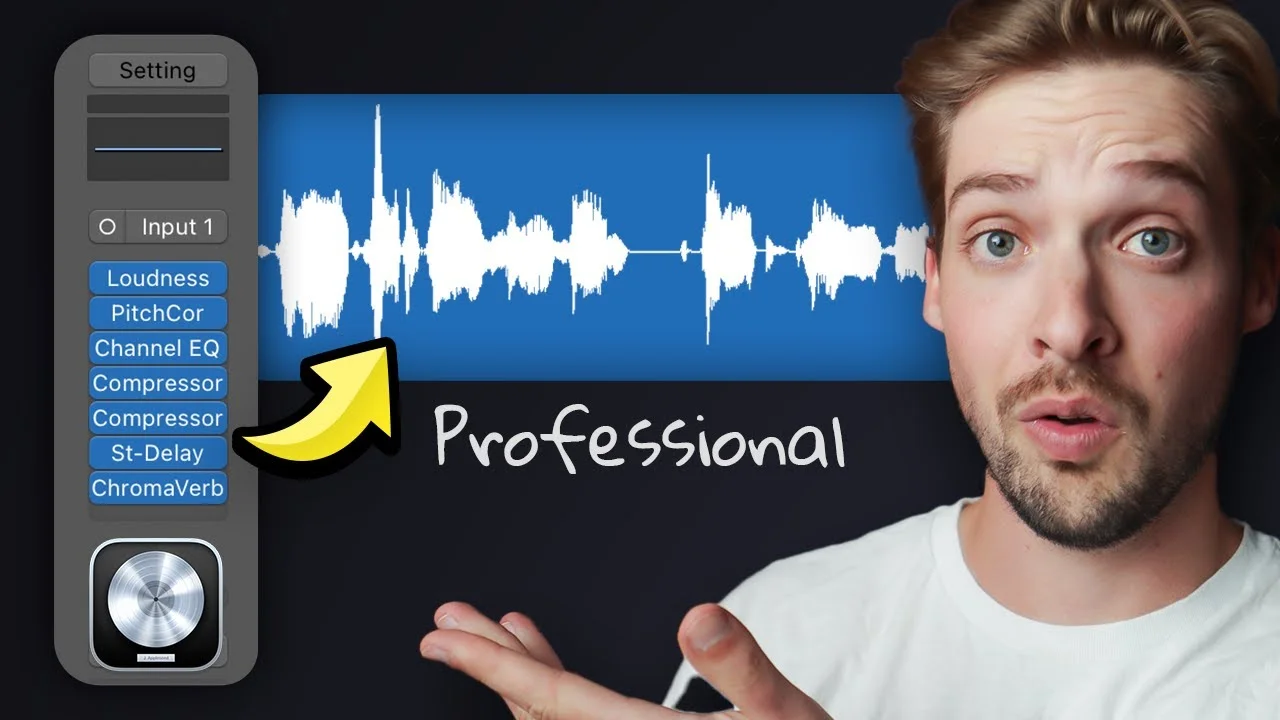
You don’t need expensive plugins or fancy gear to get radio-ready vocals. If you’ve got a solid recording to start with, Logic Pro’s stock plugins can absolutely deliver professional results.
I’m going to walk you through my go-to vocal chain that transforms amateur-sounding vocals into polished, commercial-quality tracks in just a few minutes. This isn’t theory — this is the exact process I use on client work.
I also made a full video on this…
All the ideas in this article come from the video below. If you don't feel like reading, well, I gotchu.
Part of the DAWs & Production Software series — For the full picture, read my full DAW comparison guide.
Start With the Foundation: Your Recording Quality
Before we touch a single plugin, let’s get one thing straight: no amount of processing will fix a bad performance.
Seriously.
You can’t polish a turd, and you can’t make a terrible vocal recording sound professional. Make sure your source material is clean, well-performed, and recorded properly before diving into the mix.
Got a good recording? Perfect. Let’s make it sound incredible.
Step 1: Set Your Gain Structure with a Loudness Meter
The first plugin in your chain should be a loudness meter — and this step is crucial for getting consistent results.
Here’s why most people’s vocal chains fail: they’re working at random levels. One day their vocal is hitting the compressor at -12 dBFS, the next day it’s at -6 dBFS. Different input levels = completely different results from your processing chain.
Load up Logic’s MultiMeter plugin and set it to display LUFS (Loudness Units relative to Full Scale).
Adjust your vocal level so it’s sitting around -18 LUFS. This gives you the perfect sweet spot — loud enough that your plugins are working properly, but with enough headroom to avoid digital clipping.
Why -18 LUFS specifically? This is where most professional vocals sit before processing, and it means you can copy my exact settings and get similar results.
Step 2: Pitch Correction That Actually Sounds Musical
Next up: pitch correction using Logic’s built-in pitch correction plugin.
First, make sure you’ve got the correct key selected. Nothing screams amateur like pitch correction that’s tugging your vocals toward the wrong notes.
The magic happens in the R-Time setting (that’s short for “Reaction Time”):
- Lower R-Time values = more aggressive correction, closer to that T-Pain auto-tune effect
- Higher R-Time values = more natural, subtle correction that just tightens up the performance
Most vocals sound best somewhere in the middle. Start around 150-300ms and adjust to taste. You want it tight enough to fix the pitch issues, but natural enough that listeners don’t notice the processing.
Step 3: EQ Like a Pro
Time for some surgical EQ work using Logic’s Channel EQ.
High-Pass Filter
Start with a low cut (high-pass filter). Sweep it up until you start to hear it affecting the bottom end of the vocal, then back it off slightly. This removes unnecessary low-end rumble without making the vocal sound thin.
Most vocals can handle a high-pass around 80-120 Hz, but trust your ears over any specific number.
Problem Frequency Removal
Next, we’re hunting down the mud. Create a narrow Q boost and sweep around 300 Hz. When you find the frequency that makes the vocal sound boxy or muddy, cut it by 2-4 dB.
Do the same thing around 800 Hz — this is where vocals often get honky or nasal. A small dip here can clean up the midrange significantly.
High-End Sparkle
Finally, add a high shelf around 8 kHz and boost by 2-5 dB. This gives the vocal that professional shine and helps it cut through the mix.
The key with EQ is subtlety. Small moves add up to big improvements.
Step 4: The Two-Compressor Approach
Here’s where things get interesting. We’re using two compressors in series — this is a technique used in professional studios worldwide.
First Compressor
Load up Logic’s Vintage VCA or any FET-style compressor and dial in these settings:
- Ratio: 4:1
- Attack: 10 milliseconds
- Release: 50 milliseconds
- Auto Gain: OFF (this is crucial)
Now adjust the threshold until you’re getting at least 5 dB of gain reduction on the loudest parts. This first compressor is doing the heavy lifting, taming the dynamic range.
Second Compressor
Here’s the cool part: duplicate that exact same compressor with all its settings. In Logic, hold Option while clicking and dragging the plugin to create an identical copy.
On this second compressor, only adjust the threshold until you’re getting about 3-5 dB more gain reduction.
Why two compressors instead of one doing 8-10 dB of reduction? Serial compression sounds way more musical. Each compressor is working moderately hard instead of one compressor working extremely hard. The result is transparent, punchy compression that doesn’t sound squashed.
Step 5: Adding Dimension with Delay and Reverb
Time to add some space and dimension to your vocal.
Stereo Delay
Load up Logic’s Stereo Delay and immediately adjust the high and low cut filters. You want the delay to sit behind the main vocal, not compete with it.
Cut some low-end so the delay doesn’t muddy up your mix, and roll off some highs so it doesn’t interfere with the vocal’s presence. Then adjust the mix knob to taste — usually somewhere between 10-25% works well.
Reverb Selection
For reverb, choose your preset based on the feeling of your song:
- Large reverbs = grandiose, epic, stadium-filling sound
- Small reverbs = intimate, close, personal feeling
Load up ChromaVerb or SilverVerb and pick something that matches your track’s vibe.
Critical setting: make sure the dry knob is at 100%. You want the original vocal coming through completely, with the reverb adding space rather than replacing the dry signal.
Adjust the wet knob until you can just barely hear the reverb supporting the vocal. Less is usually more.
The Transformation: Before and After
When you A/B this chain against your raw vocal, the difference should be dramatic.
The processed vocal will sound:
- Tighter from the pitch correction
- Cleaner from the EQ moves
- More controlled from the compression
- More professional from the added space and dimension
But here’s the thing — it should still sound like the original performance, just elevated. If it sounds over-processed or artificial, dial back the settings.
Beyond This Chain: Taking Your Vocals Further
This chain is your foundation, but professional vocal production goes way deeper.
Different genres need different approaches. Pop vocals might need more compression and brightness. Hip-hop vocals might need different EQ curves. Rock vocals might need saturation and parallel compression.
The key is understanding why each plugin is there and what it’s doing to your sound. Once you get that, you can modify this chain for any style or genre.
Want to dive deeper into vocal production? I’ve got free vocal presets that use these exact techniques — you can drag and drop them onto your tracks and instantly hear professional results.
Professional vocals aren’t about having the most expensive gear or the fanciest plugins. They’re about understanding signal flow, knowing what each processor does, and making deliberate choices that serve the song.
Start with this chain, learn how each piece affects your sound, then make it your own.
About Mattie
Mattie is a music producer, songwriter, and educator specializing in Logic Pro and vocal production. With over 10 years of experience in the music industry, he's helped thousands of artists transform their home studio recordings into professional-quality tracks.
As the founder of Music By Mattie, he creates tutorials, presets, and courses that simplify complex production techniques. His mission is to make professional music production accessible to everyone, regardless of budget or experience level.