![How to Master for Spotify with Logic Pro Stock Plug-Ins [2023 Update!] - Logic Pro tutorial by Music By Mattie](/images/blog/covers/master-for-spotify.webp)
How to Master for Spotify with Logic Pro Stock Plug-Ins [2023 Update!]
In this video, you will learn how to get a great sounding mix without spending a fortune on plug-ins. I'll show you how to use the stock Logic Pro plug-ins to g

Key Takeaways
- Master your tracks to exactly -14 LUFS so Spotify won't mess with your sound.
- Keep -10 dB headroom on your stereo output before starting the mastering process.
- Use subtle compression and EQ changes since you're affecting the entire soundscape.
- Logic's stock Limiter and Loudness Meter combination gets you to Spotify's standards.
- Consider iZotope Ozone 10's AI assistant as an upgrade for faster professional results.
Want to master your tracks for Spotify without breaking the bank on expensive plugins? I’ll show you exactly how to get professional-sounding masters using only Logic Pro’s stock plugins — plus reveal the secret weapon that gets me better results every single time.
Spotify has completely changed how we approach mastering. And if you don’t understand their guidelines, they’re going to mess with your carefully crafted sound.
Not today.
I also made a full video on this…
All the ideas in this article come from the video below. If you don't feel like reading, well, I gotchu.
Part of the DAWs & Production Software series — For the full picture, read my full DAW comparison guide.
What Is Mastering (And Why Spotify Changed Everything)
Mastering is the process of taking your finished mix and making it sound polished on all playback systems. When done correctly, mastering makes the difference between an average-sounding record and one that stands out from the crowd.
But here’s the thing — mastering has changed dramatically over the years. All due to the rise of music streaming. More specifically, Spotify.
Spotify changes the loudness levels of the songs you upload so that it matches the rest of their music catalog. This sounds bad, but it’s actually a good thing.
Because Spotify changes the volume of our tracks, if we don’t follow their guidelines, they’re going to add color to our sound. Most of the time this is a subtle change, but we really don’t want Spotify messing around with our music that we’ve worked so hard on.
The Spotify Mastering Guidelines You Need to Know
Here’s what Spotify expects from your uploads:
“We use loudness normalization to balance soft and loud songs, creating a more balanced, uniform experience.”
They adjust tracks to -14 dB LUFS (Loudness Units Full Scale). That means if your track isn’t loud enough, Spotify will turn it up to meet these standards. If it’s too loud, they’ll turn it down to meet these same standards.
This can be a problem. We don’t want Spotify changing the sound we’ve already worked so hard to achieve.
The solution? Master your tracks to exactly -14 LUFS so Spotify won’t touch them.
How to Master for Spotify Using Logic Stock Plugins Only
I’m going to walk you through mastering my latest release “Thunder” using only Logic’s stock plugins. You can find the song linked in my free downloads if you want to follow along.
Step 1: Check Your Mix Levels
First, I want to check the stereo output to make sure I have enough headroom. I’m looking to hit about -10 dB on the stereo output.
Looking at my mix, I’m hitting around -8 to -10 dB — right where I want to be.
If your track is significantly louder than -10 dB on the stereo out, go back to your mix and turn down individual instruments to bring that number down. You need headroom for mastering.
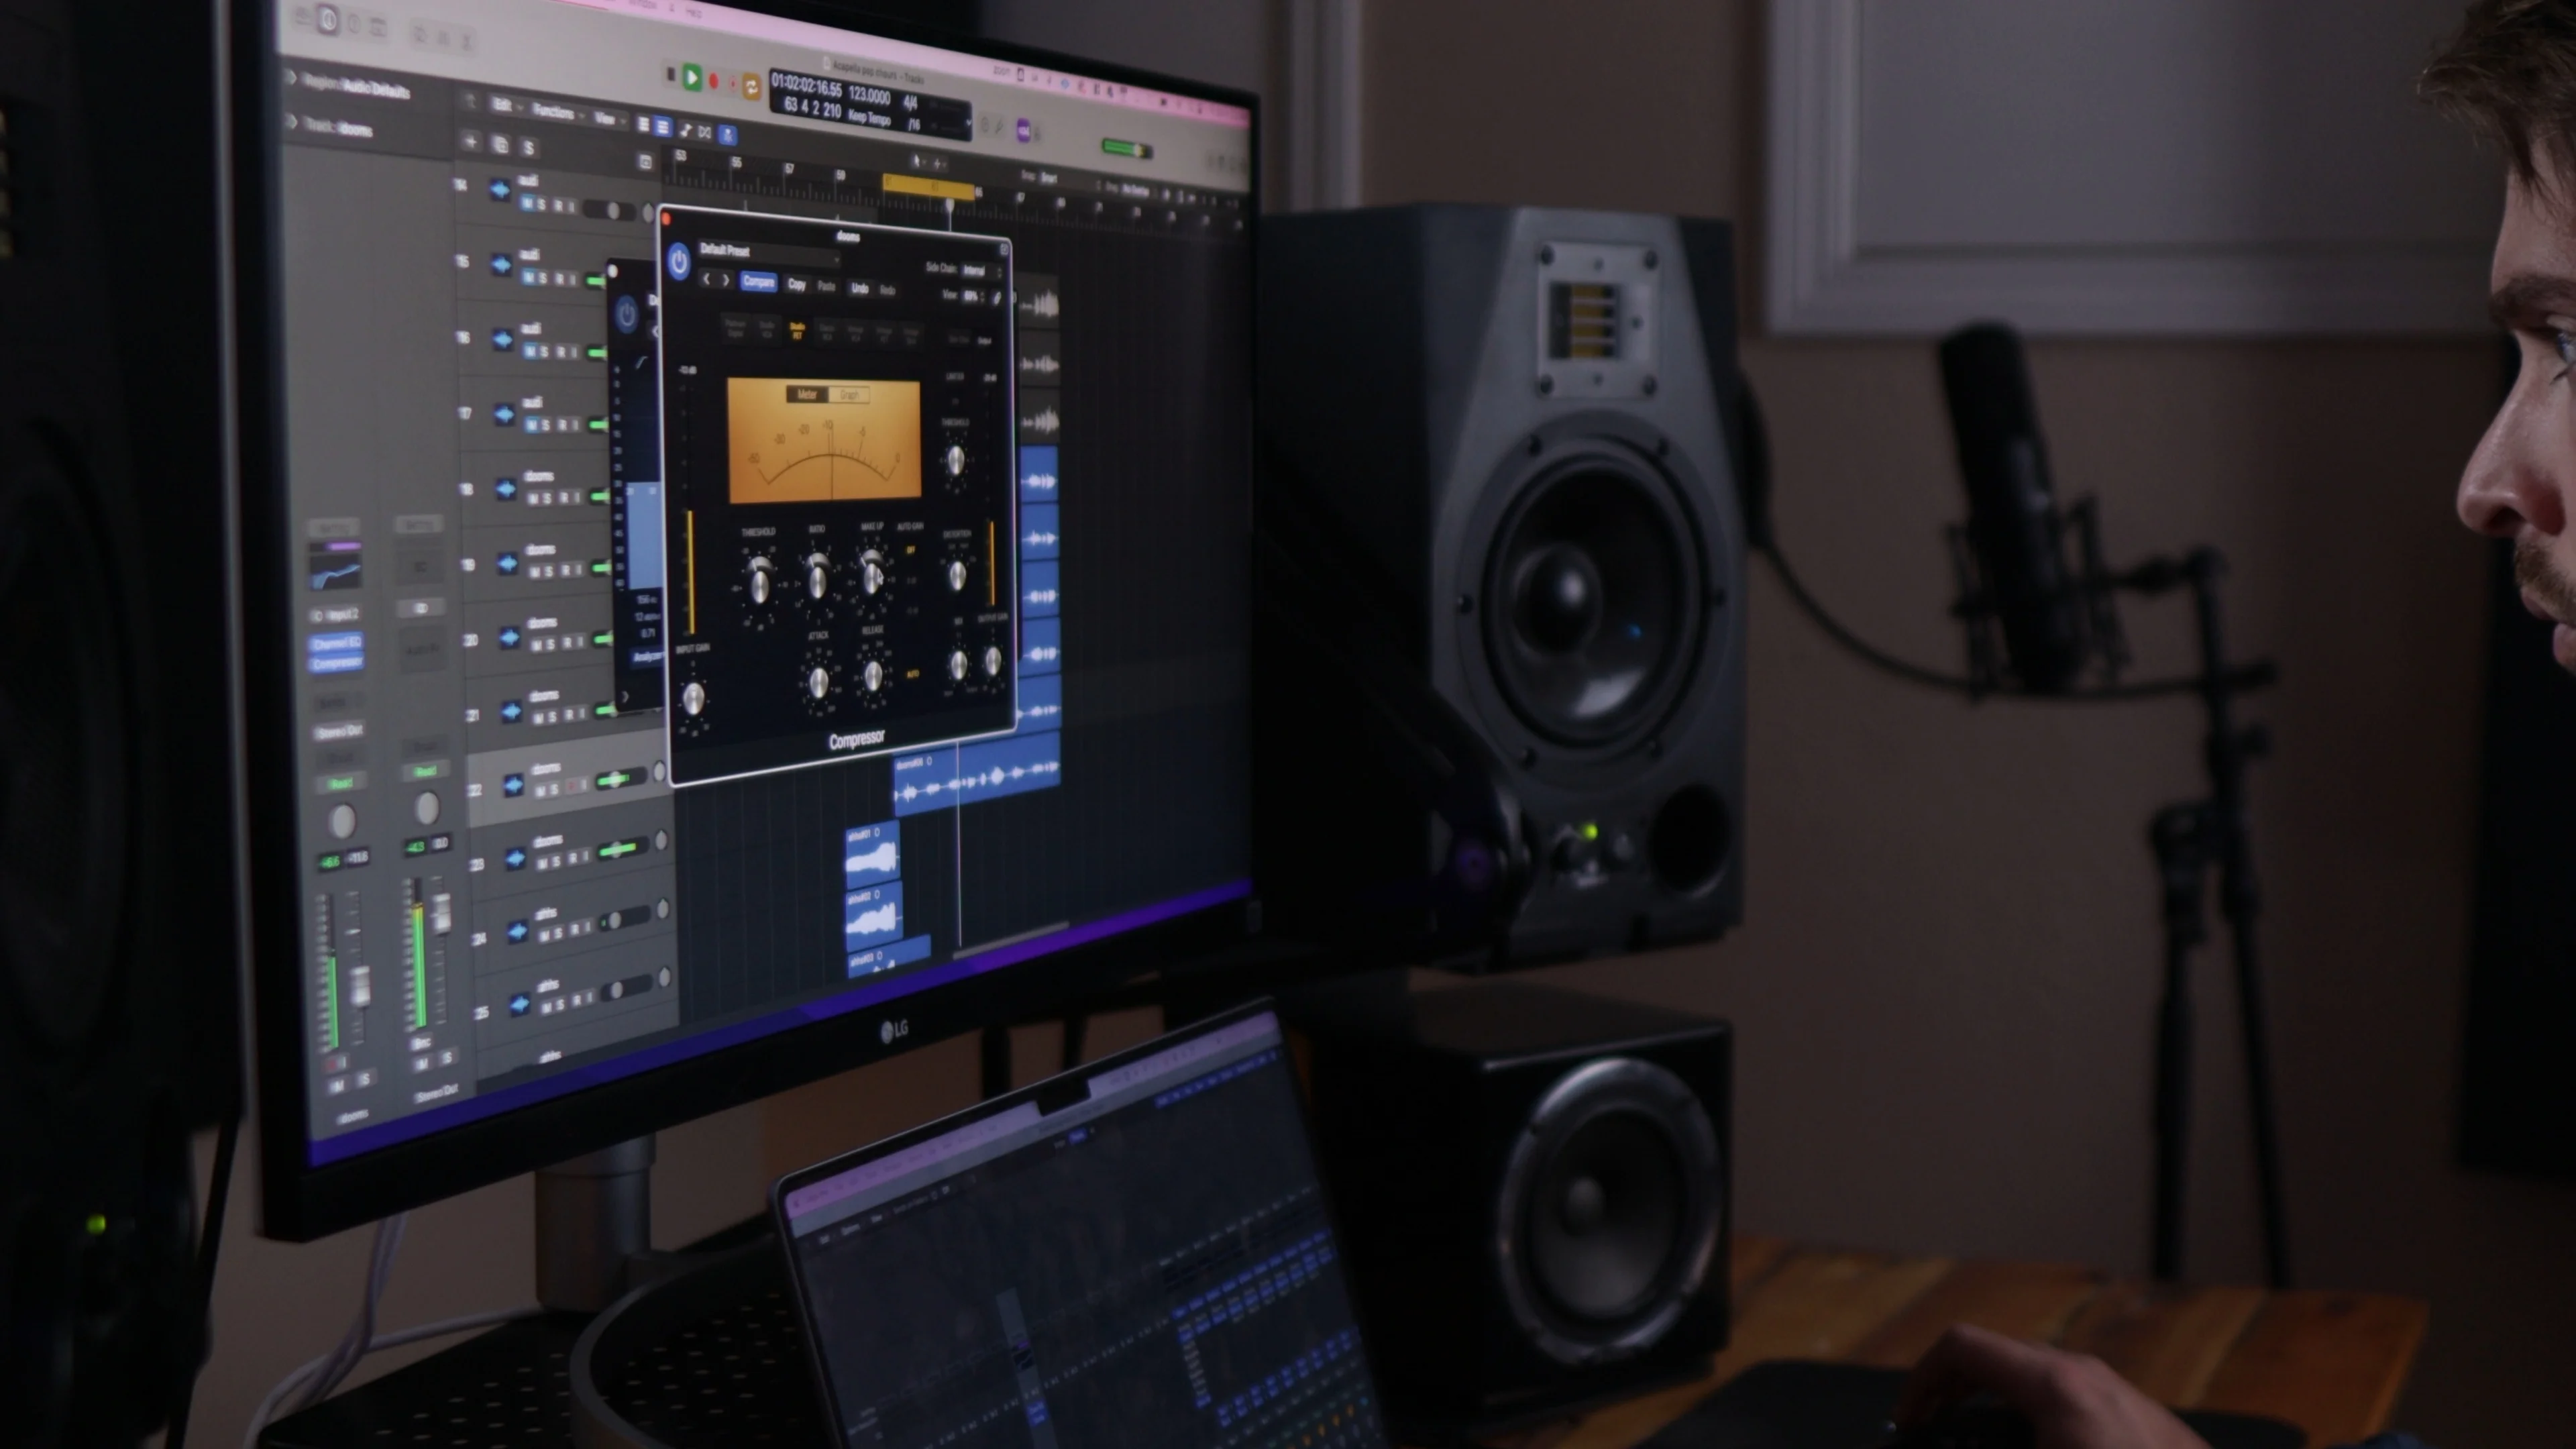
Step 2: Add Multiband Compression
The first plugin I’m adding is Logic’s stock multiband compressor called the Multipressor.
A multiband compressor compresses different frequencies of the sound spectrum at different rates. This lets you really hone in on the sound you’re looking for.
Here’s my approach:
- Start with the “Final Pop Compressor” preset
- Adjust the thresholds until I’m getting some subtle gain reduction
- Keep the ratios really low — we don’t want heavy compression
Always turn your plugins on and off as you work to make sure they’re actually doing something and that you’re going in the right direction.
Step 3: Shape the Frequency Spectrum with EQ
Now I might want to change the frequency spectrum slightly with some EQ. I’m a big fan of the Vintage EQ series that Logic has released recently.
I’m using the Vintage EQ 2 — this is an emulation of a classic Pultec tube EQ.
My process:
- Find a mastering preset to save work (“Mix Bus Master Shine”)
- Adjust parameters from there
- Keep changes really subtle
Remember — because we’re affecting the entire soundscape with mastering, we want to keep our changes minimal.
Step 4: Add Overall Track Compression with Parallel Technique
Time to throw on some overall track compression using parallel compression. This technique helps us get more volume before we hit the limiter later.
I’m using Logic’s Studio VCA compressor:
- Keep the ratio really low (1.1 or 1.2)
- Set attack time really slow
- Set release time really fast
- Use the mix knob for parallel compression — start at 0% and gradually increase until you hear subtle compression and slight “glue”
This is really subtle stuff. You’re not looking for obvious compression here.
Step 5: Final EQ Shaping
Let’s add one more EQ for overall shaping of the sound. I’m looking for wide bands with really minimal gain reduction or gain addition.
My settings:
- Really low Q value
- Really low actual gain reduction (maybe 0.5 dB at most)
- Wide, gentle curves only
Step 6: The Most Important Step — Getting to -14 LUFS
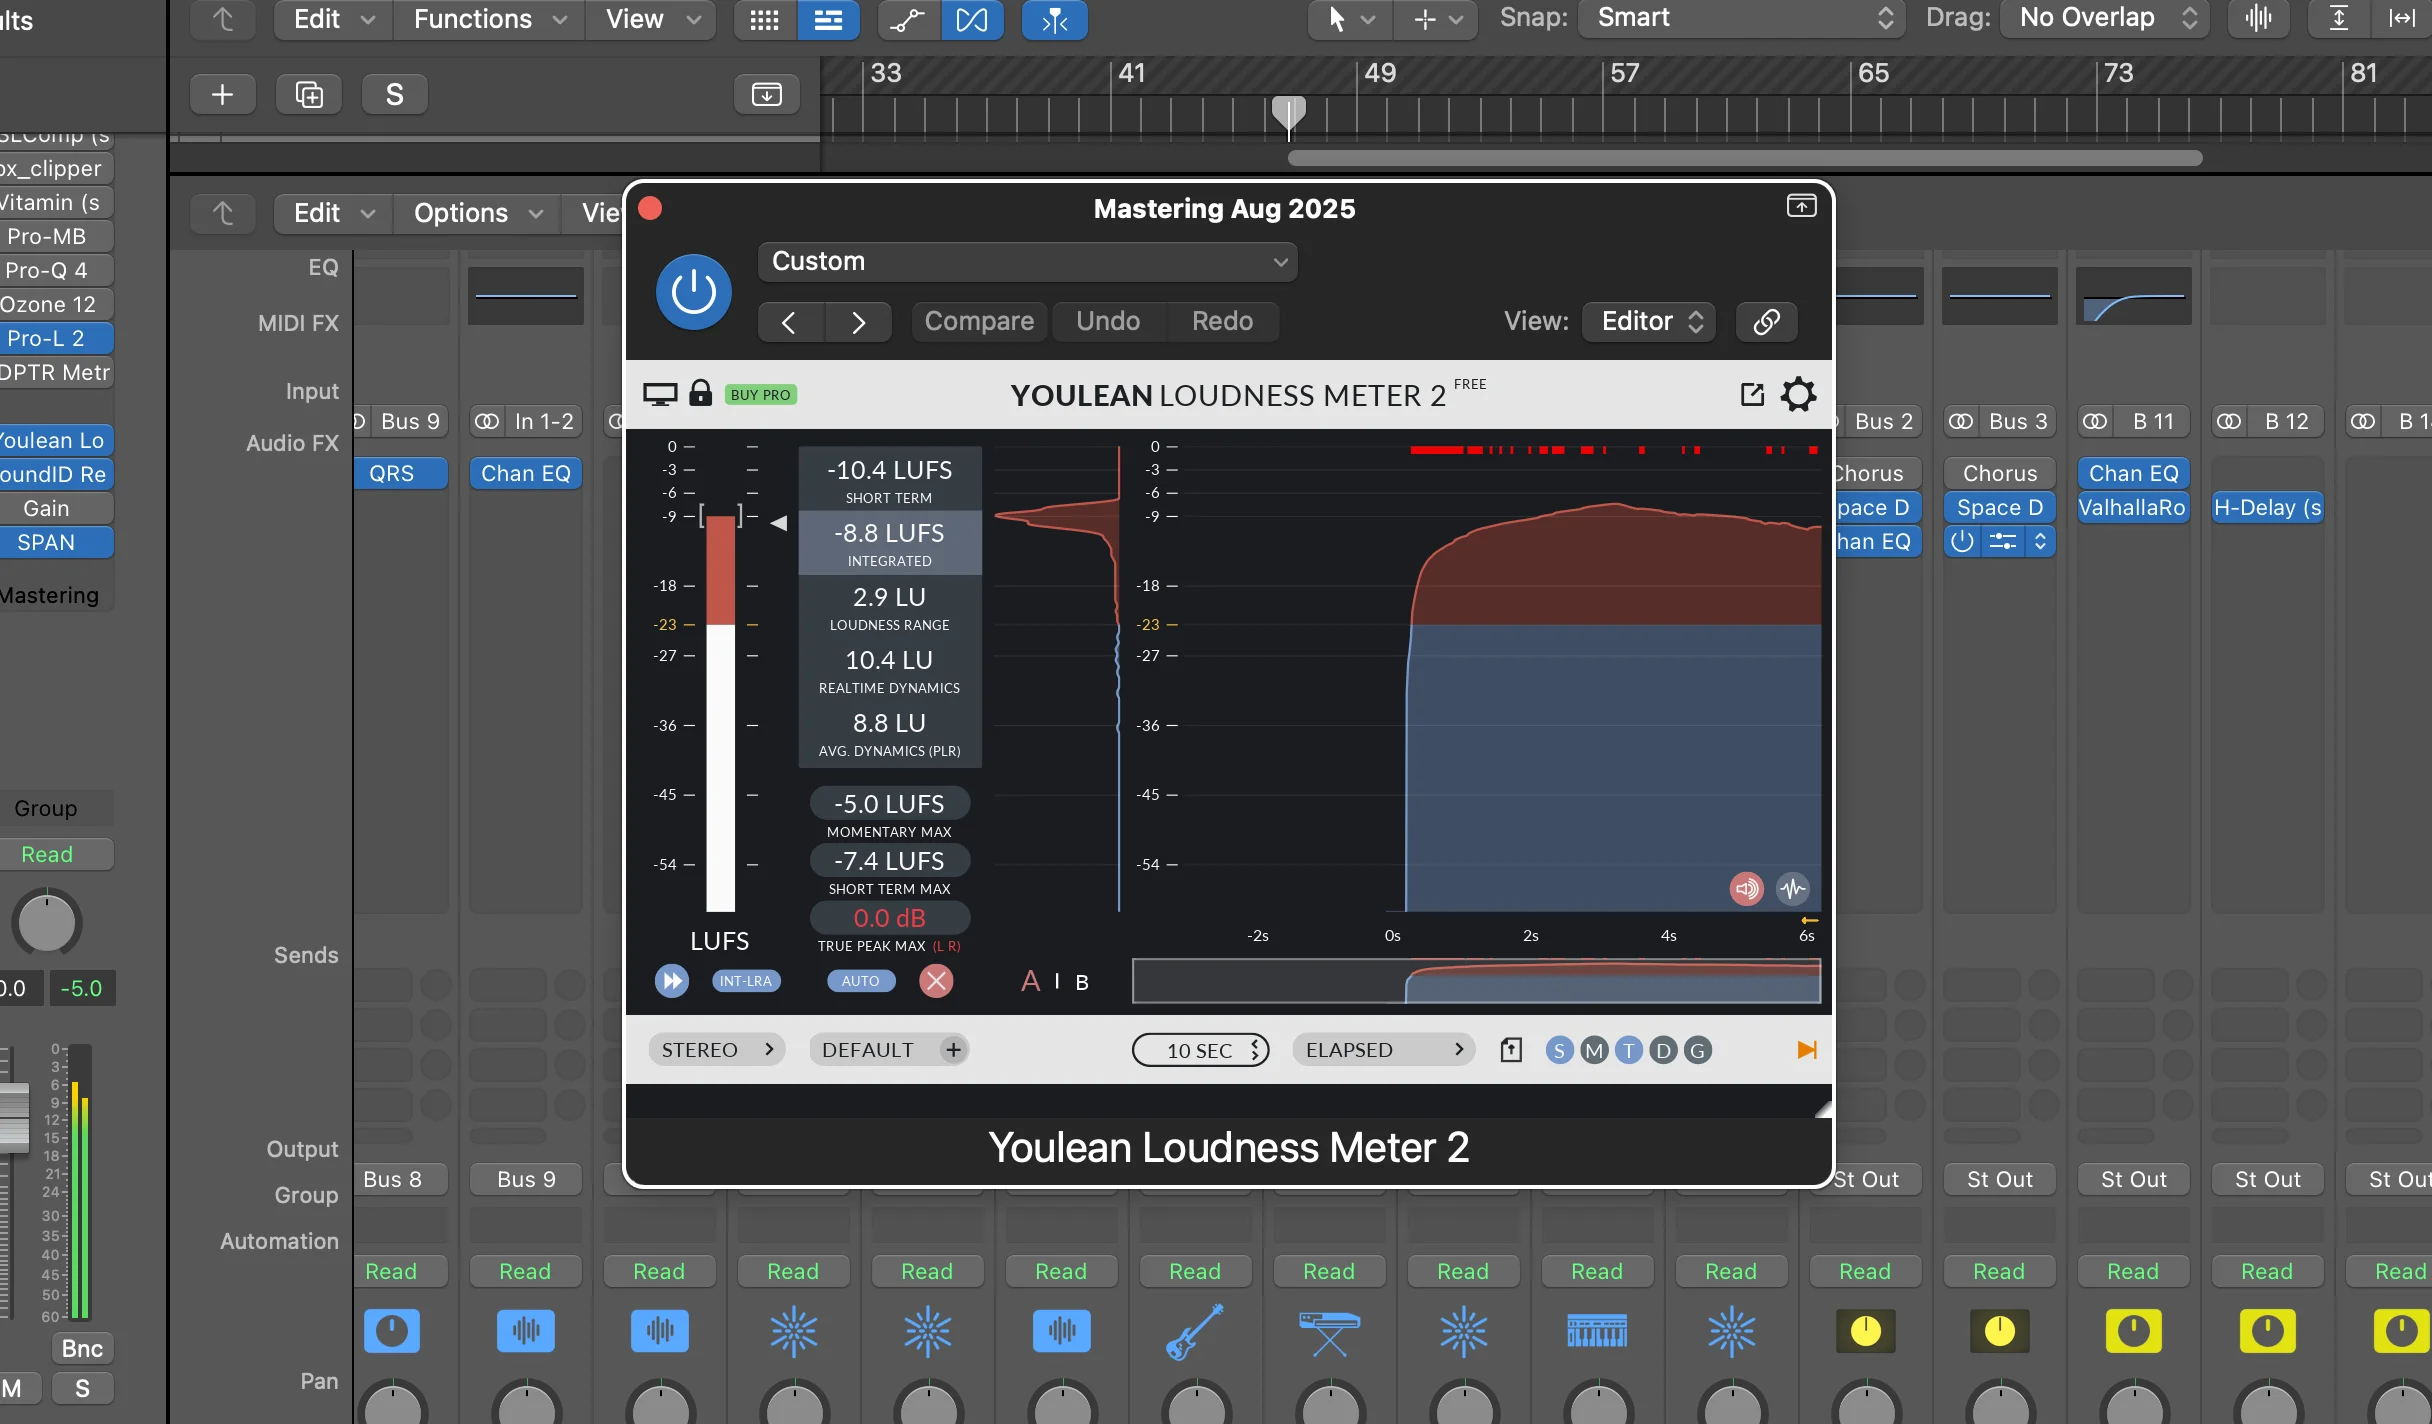
Finally, the most important plugin combination that’s going to get us to -14 LUFS. This uses two stock Logic plugins: the Limiter and the Loudness Meter.
Pull both of these up at the same time so you can see exactly what you’re getting.
The loudness meter shows three columns: momentary, short-term, and integrated listening levels. These give a better picture of what we actually hear when listening.
Here’s my process:
- Set the limiter’s output level to -1 dB
- Adjust the gain until the integrated reading hits around -14
- Click “Start” on the loudness meter to get accurate readings
- Fine-tune until you’re getting about -14 LUFS integrated
In my example, I’m getting about 1.7 dB of gain reduction on the limiter — no distortion will happen there. And I’m hitting exactly -14 for the integrated reading, which is exactly what Spotify is looking for.
That’s it. You’ve just mastered your track for Spotify using only Logic’s stock plugins.
What Kind of Plugins Do Professionals Actually Use?
Now let me show you a mastering chain I would use on an actual client’s mix. This is my professional setup:
- FabFilter Pro-MB — multiband compressor
- SSL Master Bus Compressor (Waves) — for that classic SSL glue
- Pultec EQP-1A (Waves) — similar to the Logic vintage EQ
- iZotope Ozone 9 — for EQ, dynamic EQ, and stereo imaging
- Vitamin (Waves) — for harmonic enhancement
- Professional limiter — final level control
The difference is noticeable. It sounds clearer, wider, more punchy, with better low-end definition. There are a lot of things happening with this professional chain.
Granted, it’s different in volume, so it might be hard to hear the differences over phone speakers or computer speakers. But believe me, these changes are working.
My Secret Sauce Plugin for Mastering
I’ve shown you two different mastering chains — one with stock Logic plugins and one that I use professionally. Now it’s time to reveal my secret sauce for mastering.
iZotope Ozone 10.
It’s an all-in-one mastering plugin that can give you fantastic sounding results with just a few clicks. I used Ozone 9 in the previous example, but Ozone 10 takes it to another level.
Here’s what makes it incredible:
AI-Powered Master Assistant
Ozone 10 can analyze your song and create a mastering chain automatically. My favorite parts of this plugin are:
- Dynamic EQ that finds problem frequencies and ducks them as needed
- Stereo spread tool that can make your mix wider according to different parts of the frequency spectrum
- Limiter that’s automatically set for -14 LUFS with an output of -1 dB — exactly what Spotify is looking for
Pretty cool, right?
It’s Not Perfect (But It’s Close)
Sometimes I see very drastic EQ curves that don’t make sense. Sometimes the algorithm doesn’t detect what genre I’m actually working in.
But it’s a fantastic starting point for most masters. If you’re a beginner, I can’t recommend this plugin enough.
I personally use it in conjunction with some of the paid plugins I mentioned in my professional mastering chain. But it always gives me really good results as a foundation.
The Bottom Line on Mastering for Spotify
Mastering is complicated, but starting with Logic’s stock plugins is a great way to get familiar with the tools and the workflow.
Here’s what we covered:
- Check your mix levels — aim for -10 dB on your stereo out
- Use multiband compression — Logic’s Multipressor with subtle settings
- Shape with vintage EQ — gentle, wide curves only
- Add parallel compression — for glue and extra volume headroom
- Final EQ shaping — minimal adjustments with low Q values
- Limit to -14 LUFS — use Logic’s Limiter and Loudness Meter together
As you get your feet underneath you, consider investing in more advanced plugins like Ozone 10. It’s not necessary, but it can definitely speed up your workflow and give you more professional results.
The most important thing? Hit that -14 LUFS target. If you do that, Spotify won’t mess with your sound. And that’s exactly what we want.
Your masters will sound consistent across all playback systems, and you’ll have full control over how your music sounds to your listeners. That’s the whole point of mastering.
Want a professional starting point? My Vocal Magic presets give you ready-made vocal chains for any genre — EQ, compression, reverb, and more, all dialed in and ready to go.
Or grab my free vocal presets to try before you buy.
About Mattie
Mattie is a music producer, songwriter, and educator specializing in Logic Pro and vocal production. With over 10 years of experience in the music industry, he's helped thousands of artists transform their home studio recordings into professional-quality tracks.
As the founder of Music By Mattie, he creates tutorials, presets, and courses that simplify complex production techniques. His mission is to make professional music production accessible to everyone, regardless of budget or experience level.